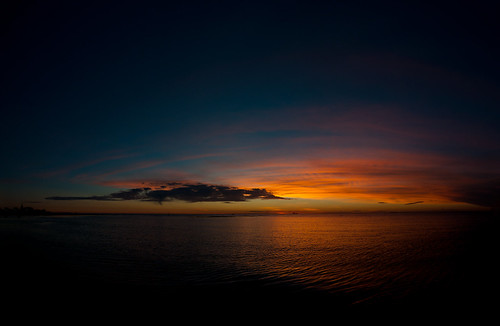
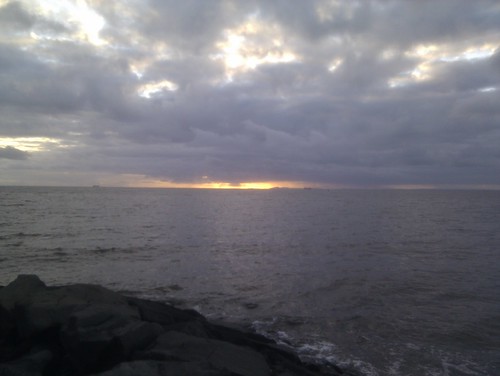
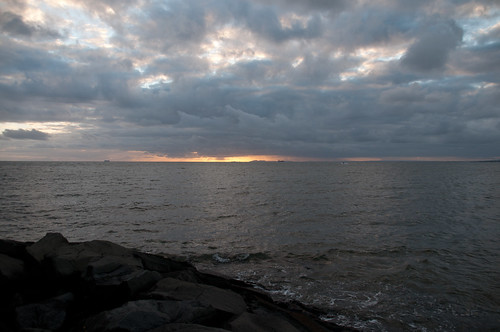
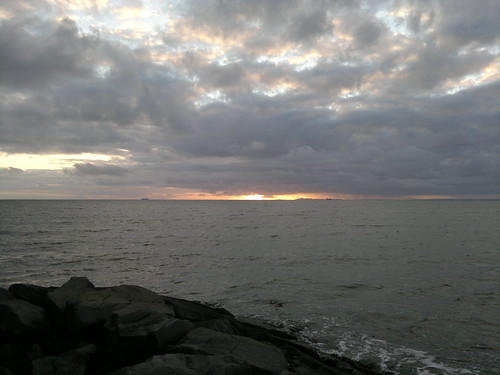
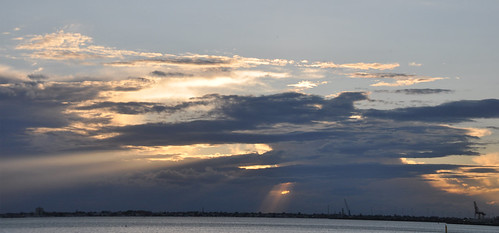
Magic hour, the hour around sunrise and sunset is called that for a reason. The best light can be found when you have a touch of luck and a lot of patience. This shot was taken from what was a fairly average sunset. But instead of putting the camera away and heading home, I stayed out for another 30 minutes, to grab the last touch of light.
In taking this shot, I wanted the whole sky, even with my 11-16mm Tokina, I still didn’t feel I had the whole sky. Thus I went for the panorama. When lining up the shot, the one thing I did notice, standing on the foreshore was the small waves lapping on the shore. When trying to line up a panorama, waves are just a path to heart ache. So I walked out till I was thigh deep in the water, passed the lapping waves.
This is a handheld panorama of about 10 shots, with a lot of overlap. When shooting panorama’s always shoot in manual mode. That way, when the shots merge, you will have consistent levels across each shot. Checking one shot that balances the light and dark will mean that your levels will be averaged out. The final image is 6335 x 4133 ( compared to 4288×2848 from the D90 )
Also this was one of my first sunset walks with the new GPS, but for some reason, my GPS decided I was 10 meters above sea level.
Camera
Nikon D90
Exposure
0.004 sec (1/250)
Aperture
f/6.3
Focal Length
16 mm
ISO Speed
250
Exposure Bias
0 EV
Flash
No Flash
Date and Time (Modified)
2010:12:04 21:56:54
Exposure Program
Manual
Date and Time (Original)
2010:12:04 20:44:05.00+11:00
Date and Time (Digitized)
2010:12:04 20:44:05
Max Aperture Value
2.8
Custom Rendered
Normal
Exposure Mode
Manual
White Balance
Auto
Focal Length In35mm Format
24 mm
Image Number
87921
Lens
11.0-16.0 mm f/2.8
GPS Version ID
2.2.0.0
GPS Latitude
37 deg 54′ 57.54″ S
GPS Longitude
144 deg 59′ 8.35″ E
GPS Altitude Ref
Above Sea Level
GPS Altitude
10 m
GPS Date Time
2010:12:04 09:44:02Z
GPS Satellites
10
GPS Img Direction Ref
Magnetic North
GPS Img Direction
8.3
( Linked image is to lightboxed version as well, which looks much nicer )
And you can buy this as a print from RedBubble as well
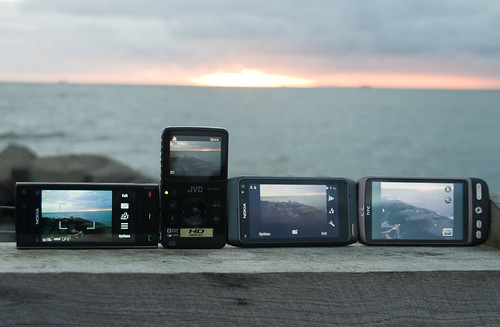
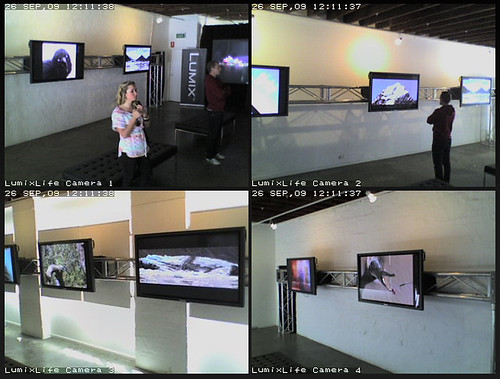
All devices were set on automatic mode and a couple of shots were taken, the best of which I uploaded to flickr.
Each image links through to the flickr version, where you can see the full image as well.
——————————————————————————-
Nokia X6 – 5MP
Exposure
0.01 sec (1/100)
Aperture
f/2.8
Focal Length
5.2 mm
ISO Speed
100
X-Resolution
300 dpi
Y-Resolution
300 dpi
——————————————————————————-
JVC FM1 – 8MP
Exposure
0.006 sec (1/163)
Aperture
f/2.8
Focal Length
3.9 mm
ISO Speed
100
X-Resolution
72 dpi
Y-Resolution
72 dpi
——————————————————————————-
HTC Desire – 5MP
This is the only Exif Data for the shot from the Desire
ISO Speed
100
X-Resolution
72 dpi
Y-Resolution
72 dpi
——————————————————————————-
Nikon D90 – 12MP
Exposure
0.006 sec (1/160)
Aperture
f/6.3
Focal Length
18 mm
ISO Speed
200
X-Resolution
240 dpi
Y-Resolution
240 dpi
——————————————————————————-
Nokia N8 – 12MP
X-Resolution
300 dpi
Y-Resolution
300 dpi
Exposure
0.005 sec (1/218)
Aperture
f/2.8
Focal Length
5.9 mm
ISO Speed
105
I think the D90 wins… but then it should. But the N8 for a mobile phone, which of course happened to be the only device that could upload the photos from all the other devices, comes a very very respectable second.
This is a cross post of a joint blog post from Neerav’s article…
RAW and JPG are different ways of creating photos in a digital camera. Each has advantages and disadvantages. In the Blue corner we have Wolfcat who argues in favour of the RAW file format and in the Red corner we have Neerav who argues in favour of the JPG file format.
I take 99.9% of my photos in JPG format and have used these successfully to create A4 posters, a photo book, sold photos for use in technology websites and magazines to accompany my articles, and had some displayed in an art gallery on 32-50inch TV screens.
I understand that RAW has some technical benefits but for the vast majority of photographers out there JPG will be the best option because:
for 99% of people JPG image quality is already far more than they need
it’s convenient because images don’t require any post-processing
the vast majority of keen amateur photographers don’t have the time or inclination to sit at a computer for hours after a day spent taking photos, post-processing RAW camera files into JPG photos manually one by one.
RAW files cannot be immediately shared to the Internet because they require processing with a computer that is reasonably fast. When I take photographs at events I can share the best JPGs to Flickr within minutes using my cheap, underpowered netbook computer,
the more affordable digital cameras used by keen amateur photographers are noticeably slower at taking RAW format photos than JPG’s. I guarantee “RAW only” hardliners have missed out on photo opportunities because their camera takes time recording each massive RAW file,
JPG file sizes are far smaller and therefore take up less space on your camera card, in your photo archive, and when transferring them internally on your home network or on the internet.
Arguments that storage space is getting cheaper are irrelevant. Try calculating how many camera cards you’d need to store 100 photos/day, every day for a month on holiday and you’ll see what I mean,
JPG files can be viewed on any desktop or laptop computer as well as many electronic devices including smartphones, TV’s, dvd/bluray players etc,
RAW encourages lazy “i can always do it properly on the computer” photography. I own Photoshop CS5 and find it useful, but much prefer to get the camera settings right first time in the camera and not have to spend time fiddling later
There are over a hundred different variations of RAW file formats needing special software to convert them to JPG. Often new cameras record in a RAW format that can’t be opened by older image processing applications like Adobe Photoshop.
The only times I would ever consider using a RAW format such as DNG are:
if I was being paid to do a commercial photography job. Even then I’d use DNG+JPG which takes each photo in both formats so I could use the JPG’s immediately and the DNG’s only if required.
If I was on holiday and paying lots of money for a unique one off experience eg: hot air balloon ride then I’d set my camera to DNG+JPG.
I leave the final word to respected amateur photographer and camera reviewer Ken Rockwell:
If you shoot hundreds or thousands of images in a day shoot JPG and don’t worry. The quality is the same for almost all intents and purposes as raw, and the raw files would take gigabytes or tens of gigabytes and resultant hours to download, convert, catalog and burn to backup CDs. In fact, if you shoot this much then JPG can give better quality since attempting to shoot this much raw will constipate your workflow and you could miss making some images entirely as your cards fill up. You’d always be running out of memory cards or time waiting for the access light to stop blinking.
If you love to tweak your images one-by one and shoot less than about a hundred shots at a time than raw could be for you. In fact, if you prefer the look you can get from raw (it may be different from JPG in some cases depending on software) you can let your computer batch process images and save the results as JPGs, too. I almost never shoot anything in raw, and when I do I never see any difference for all the effort I wasted anyway. (I can see differences if I blow things up to 100% or bigger on my computer, but not in prints.)
First confession I shoot RAW and JPG. However 99% of the time I just ignore the JPG files, cause I never use them, never see them and they just end up taking up space on my harddrive.
I’m a keen landscape shooter. I like to document the world around me looking for that unique angle on this great country we live in. Whilst I shoot in colour.. I’m a huge fan on the black and white as well for real story telling.
There is only one kind of RAW. The kind your camera shoots. I shoot with a Nikon D90, so I get .NEF files. I really don’t care about other RAW formats. Why, because that is like saying I drive a Diesel powered car, but there are too many kinds of Petrol to confuse me.
Quality doesn’t matter. No of course it doesn’t, unless you care about the photo. Unless that photo is a touch under/over exposed, the white balance is out, the horizon line is a few degrees of centre, the lens you used has a certain type of distortion that throws out straight lines or the highlights are a bit over exposed. Any of these mean you are going to want to “fix” the photo.
Sure Ken Rockwell can shoot in full manual mode and get White Balance and everything perfect every time, never needing to touch Photoshop at all to fix any image…. But are you Ken Rockwell.
You’re are sure that you know what the correct colour temp for each setting is, because you shoot in a perfectly stable environment, with colour charts and controlled lighting every time. Nope didn’t think so. Guess what you are going to want to correct that photo.
Batch Processing is your friend. I use Lightroom3 to processes all my RAW images. If they are similar I can spend time on one image get the settings right and apply them to hundreds of photos in a few minutes.
Raw is non destructive, you aren’t dealing with a lossy compression like JPG you have all the information to play with. You don’t have to trust the camera to guess what you wanted, you have complete control. JPG is also 8bit colorur. The RAW files I shoot are 12bit colour.
Cost of storage is cheap. I have an offsite backup of my photos on a 1.5TB drive that I purchased for $98 dollars. I run a few 4gb cards and can shoot around 240 images per card. And I always take a harddrive with me on trips to backup the images anyway, that drive is a USB powered HD that is 880gb which cost me $120.
JPG is easier. Yes it is, but then so is buying a pizza from the supermarket compared to making one at home. The one you make at home will have all the toppings you want and be to your taste, not the cheapest food to make the pizza.
And finally how often do you need to “get” the shot up straight away. If you are really doing that, you are shooting from a mobile phone anyway. Most of the time you are going to have access to something to process the image regardless. ( I know I do )
If you only store the JPG’s in 6 months time or a years time when someone spots that great image and wants the full size image for print… what did you do with it, oh yes that is right, you compressed it put lots of effects in photoshop and compressed it again.
While I do agree that JPG is easier to use, just because it is easier doesn’t make it better. I like to ensure that the colours on my image are visually correct and that the tones reflect the mood of the image. Say I want a black and white image, shooting RAW gives me complete tonal control much more than JPG ever can. And all for very little work!
And I’ll leave the final word to these images….
The JPG VS the RAW.
JPG
This RAW took me a minute to tweak in Lightroom 3.
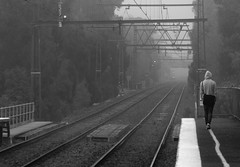
I should have titled this… how to take photos in places your not allowed to. See the whole City Loop system is under the control of private enterprise and like every other railway station you are not allowed to take photos of trains from the platform in Melbourne. You can apply to get a permit to do some of the stations, but the underground is very frown upon. <rant>See terrorists only use high res DSLR’s to take photos… never do they just use a camera phone or a hidden camera. So if you have a DSLR you are obviously a terrorist. </rant>
This was taken at Melbourne Central one evening heading home after a few drinks. If you are going to shoot in places like this, never have a tripod that will get attention drawn to you very quickly. But it is possible to get a shot like this (1.3 seconds exposure) hand held if you brace the camera, and always hold your breath, for that extra bit of stabilising. In this case it was resting against the wall.
I shot this with my Tokina 11-16mm lens to get the whole tunnel in the wide shot. This helped to get the sense of claustrophobia that is in the tunnel as well.
The next thing is to wait for the right moment. You can feel a train coming a minute before hand and I managed to squeeze of a few shots just to get my levels about right before the train came. The start of this exposure can be seen just before the Caulfield Loop sign (click through to see the bigger version). During the exposure the first carriage of the train moved completely out of shot. This gave me the lines of movement that go right to the edge of the frame.
This is one of those one shot wonders. To get these lines that I have you can only do on the first shot from the headlights of the train. That is why you should always try and get your levels right before hand for the background, remembering to compensate for the light that the moving object will create as well.
Turns out this is currently my most favoured and commented on shot both on Fickr and Redbubble. Hope you enjoy it as well
Point 18: This permit is NOT valid for photography at the City Loop Stations (Parliament, Flagstaff and Melbourne
Central). Photography is NOT permitted at these stations.
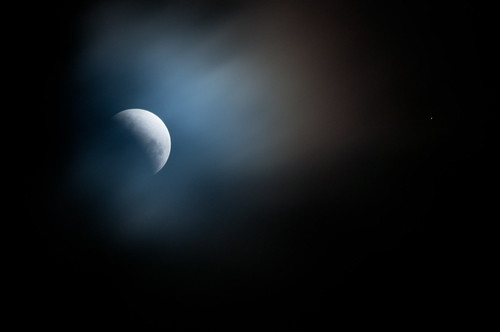
This shot has been very popular on both Flickr and Redbubble so I thought it would be a good one to do a quick post on.
This shot is really about serendipity. Sometimes you plan a shot and mother nature well just gets in the way. Over a huge chunk of the world we were treated to a partial lunar eclipse on Saturday the 26th of June 2010. Now I knew this was coming and I knew even with my 300mm lens I’d be able to get a decent shot. What I did count on was the weather. With the eclipse due from 8:30pm that night I watched the sky and the radar to see a thick band of showers move in from 5pm. Sure we need the rain in Melbourne, what I didn’t need was the cloud cover.
But in true spirit I didn’t give up. I kept going outside every 10min to check the cloud cover… nope still 100%, and damned cold. Back inside… repeat. Then as we neared the maximum coverage of the eclipse the cloud broke just. I had about 5min of sky where I could see the moon. Of course the cloud kept obscuring the sky and the view was not 100%, but those lack of ideal conditions made the shot IMHO.
Lots of people got a nice clear shot of the moon around the world, but I was lucky to get a shot with real atmosphere. And for once I was glad the weather was not perfect. Also you will notice that the shot is not at the full 300mm. This was so I could get the star in the shot as well, which lent a bit more interest to the shot.
So remember even if it is cold, miserable and you think you are going to miss the photo you had planned, stick with it, you might just get a better shot.
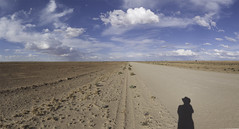
Just to Adelaide and back… but I’m going to take 3 days to get there… one day home… Might even drop in and see the Pandas whilst I’m over.
looking around mid July for this… Why 3 days.. cause I can stop and take photos along the way… and by photos I mean a lot of them. Winter along the coast is always a great time of year to see this neck of the woods and both the car and I could do with a bit of a head clearing as well.
This is going to be kind of a short one… and one I hope will surprise a few people…
This shot is from my recent sojourn to Tasmania. We had a few days in Hobart and decided to do something different, and something that wouldn’t cost a fortune (of course if more of you brought my prints…. but aside). So the plan became do a day trip down to Geeveston down in the Huon Valley. We have toured Tasmania extensively but still hadn’t made it down that part of the island and there is a very affordable public bus that goes down there, $40 for a whole day excursion for two people is damned cheap in my books.
So the bus leaves town at 8:30am and we head down the coast. (Can you see where I am getting at….) It is a beautiful sunny/foggy morning in Tasmania and what do I do… I grab a window seat, tweak the polarising filter to cut out some glare, dial the camera to Sports Mode and start shooting. Yes this shot was done at 80kph! out a bus window. It was one of 4 that I took as we rounded a bend where the sun was not shining on the bus so there were no reflections and that Cat said “Now” to. She called out the gaps in the trees so I could keep shooting and not waste shots on trees and powerlines. So there you go… you can shoot fast if the location and the camera settings are right.
Camera:
Nikon D90
Exposure:
0.001 sec (1/1250)
Aperture:
f/4.5
Focal Length:
18 mm
ISO Speed:
400
Exposure Bias:
0 EV
Flash:
Auto, Did not fire
Date and Time (Digitized):
2010:05:21 09:37:30
Subject Distance:
4.73 m
Focal Length In35mm Format:
27 mm
GPS Latitude:
43 deg 8′ 52.56″ S
GPS Longitude:
146 deg 58′ 40.13″ E
GPSAltitude Ref:
Above Sea Level
GPSAltitude:
6.25757575757576 m
GPSDate Time:
2010:05:20 23:37:30Z
And yes this image is on RedBubble for purchase as well
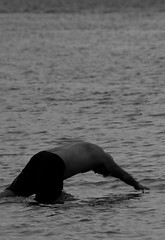
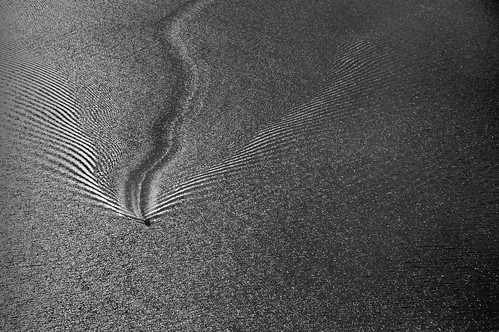
This Behind the EXIF is my shot from the weekend that covers why you need to enjoy and experience first (then take photos) and what the photographer sees is not what others do.
As a birthday present last year I was given a Trial 30 Minute flight, which is one of those things that first exhilarated me and secondly scared the crap out of me. I’m not afraid of flying by any measure and have been in small aircraft a lot of times, but to actually be flying it that is another matter.
So first things first I set out to enjoy the flight and make the most of the time in the air getting to fly the plane. All the shots I took were at the end as the pilot brought the plane into land.
Being late in the afternoon the sun was at that special angle where the light of the still water was nearly a mirror.
Technically the shot was on Auto No Flash and nothing more. I wanted to get some shots not spend time on the camera. I spotted the boat quite some distance away and knew that this was the shot I wanted.. not just and suburbs from the air.
It wasn’t until I got home I realised that I had made a beginners mistake. On friday night getting shots on the new AAMI Park stadium I had dialled up a autoshot in the rain, but pushed the ISO to 640 and the Nikon D90 doesn’t take the ISO back to auto when you go to Automode.
What this meant was that the all the shots that I took were basically to bright. The series of shot I took of the boat and water were all suffering from the same issue that the water was to bright and the shot was blown out.
As a result this is one of the more processed shots in Lightroom as well, with a crop on the left hand side to remove part of the water that was completely blown out, and then two horizontal gradients in Lightroom. The left hand gradient to darken the shot and the right hand one to lighten the shot. Then a lot of juggling to balance the overall shot with the aim of keeping it as natural as possible.
This shot has been interesting to see on flickr for what people thought it was…. which I still have trouble seeing. The first reaction of people is that it is lines in sand, not a boat on water. Which also goes to show you that the viewer of your art will never see what you did.
I am very pleased with the overall result and hope you are as well.
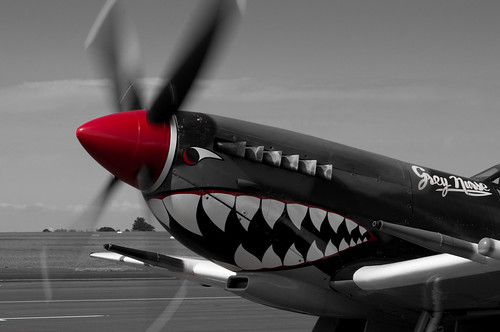
Time for another behind the EXIF data post…. This time taking just one of the shots of the Mark VIII Spitfire at Point Cook.
Firstly, Point Cook RAAF Museum do what they call Interactive Flying Days every Tuesday, Thursday and Sunday at 1pm, so there is always one plane flying at the museum on these days. Put that info in your diaries now if you are a plane spotter and either live or are coming to Melbourne. I knew in advance that the Spitfire would be flying this day (by phoning the Museum they can often tell you up to a month in advance what planes will be flying). Note there is very limited public transport to Point Cook, so far easier to drive out or get a lift from someone.
So once again like my last post a bit of research never goes astray.
The Spitfire is one of those must see aircraft – to see flying whilst you still can. The purr of the Merlin Engine is one of the sweetest sounds you will ever hear. Great aircraft like the Spitfire come to life when in motion, the pilot on the day describing the Spitfire as a temperamental race horse. Even if you’re not a plane spotter you’ll still love the sound and vision as the Spitfire goes screaming over head.
Sorry back to the photo…
I had my standard kit that I usually carry with me but could have just taken the D90, a fully charged battery some spare SD cards and my Nikkor 70-300mm, (because that’s all that I used).
The interactive day consisted of the pilot talking about the plane and what he was going to do, then a 10-15min flight followed by the pilot returning for questions and answers. My shot was taken just after the intro as the Spitfire was warming up before taxing off.
The reason I only have a few in flight photos up on Flickr is that the lens is crap at doing panning shots with any movement at the longer end. I have the non VR version and whilst it is great at steady long shots… get a long lens with VR if you are going to shoot planes in the air. On my possible to-buy list is the new Sigma 50-500mm OS when it comes out and I have a spare $1500 or so… until then ground shots mainly for me.
I had two spots I could take photos from… one up high over the heads of people to get the in-flight shots and one where I could get right up close to the plane. This shot was taken from the second of those spots. As the plane takes a few minutes to warm up I could also try a number of settings to find the sweet spot especially for the prop blur effect I was after.
When trying to get a partial blur on the prop, the trick is to use a slow shutter speed of around 1/125 to 1/250. Obviously if you want the prop to be a complete haze in front of the aircraft slow the shutter even more. And if you want a frozen prop use a faster shutter speed.
With high speed jets you’ll want a fast shutter speed around 1/1600 to get the vapour off the wings during high speed banking, like this shot of a F-18 Hornet
The tone dropping was done in Photoshop CS4, even in the coloured shot the red of the prop and sharks mouth stood out so well that in my eyes this treatment just suited the shot naturally. This other blog post I did has the details on how to do the effect – Tone Dropping in Photoshop in 7 easy steps)
And the EXIF Data.
Camera:
Nikon D90
Exposure:
0.008 sec (1/125)
Aperture:
f/18.0
Focal Length:
70 mm
ISO Speed:
200
Exposure Bias:
-11/3 EV
Exposure Program:
Manual
Date and Time (Original):
2010:04:01 13:18:11.00+11:00
Subject Distance:
7.08 m
Metering Mode:
Multi-segment
White Balance:
Auto
Focal Length In35mm Format:
105 mm
Scene Capture Type:
Standard
Gain Control:
None
Contrast:
Normal
Saturation:
Normal
Sharpness:
Normal
Creator Tool:
Adobe Photoshop Lightroom
Lens:
70.0-300.0mm f/4.0-5.6
GPS Latitude:
37°55’49″S
GPS Longitude:
144°44’59″E
I was also trying to find the essence of the Spitfire in one shot and this really captured it.
I have a real job, but the opinions expressed here are my own and do not reflect the views of my past present or future employers (not that I am unhappy with my current position, but then not to say that if a job offer came along in say Hawaii as Magnum P'I's side kick I wouldn't take it.)
Oh you get the idea. This is my personal blog.