Entries Tagged as 'Missing from the Exif'

Missing from the EXIF: Midnight Fireworks

New Years Eve… if you are lucky with the weather and the crowds can result in some great fireworks shots. This is the process I went through to ensure I got the shots I wanted.

First thing to do is plan. Where are you going to be, what shots do you want, and how much time are you willing to spend to get them. Getting in nice and close to the action is all well and good, but does require a big investment in time and patience. In Sydney, that can mean setting up at 8am for a midnight shoot, fighting the crowds all day to keep that clear line of sight. A clear line of sight, that come the 10 second count down can disappear in a flash as people stand up around you. In Melbourne, it isn’t quite that bad, but facing crowds for 6+ hours to get a shot, was not how I wanted to spend my New Years Eve.

So I took an easy way out… I went for the long shot. The whole of city across some water was what I was aiming for. Luckily for me, my fav place to shoot sunsets provided just the view I knew I wanted. So I had the shots pre-planned in my head some days before hand and didn’t have to fight crowds and traffic to get them.

Next on the list is practice. The midnight fireworks show might run for 10minutes. That is not the time to be changing your lens, testing focal settings, and different exposures and apertures. That 10min is all about getting the photos. In Australia (not sure about other places around the world), there are two shows. The family friendly version, much shorter, and just after dusk, and the main event. So I headed to the beach 1 hour before the first show to do a practice run. The one hour also meant I still could get a few shots of the sunset, and work out the best place to be before the fireworks started.

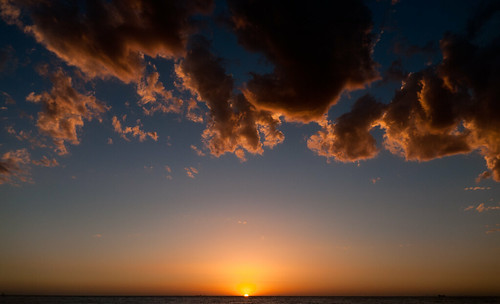
Whilst waiting, it is a good time to get some shots in as well. We had a stunning sunset on the 31 of December 2010….

Final Sunset of 2010 #nyemelb

So a few shots of that… help to tell a story, that of the whole evening….

I originally had my self set up on the Jetty at North Road, with only a few people sitting on it, it seemed to give me the shots I wanted over the water to the city skyline.  But then as more and more people walked on the Jetty, I noticed a small problem.  Camera shake.  Every single person that walked on the metal jetty gave the camera lens a small vibration.  Now shooting at 100mm plus and aiming for 3second exposures was just not going to work.  But I still had plenty of time to move to a new location just off the Jetty itself.

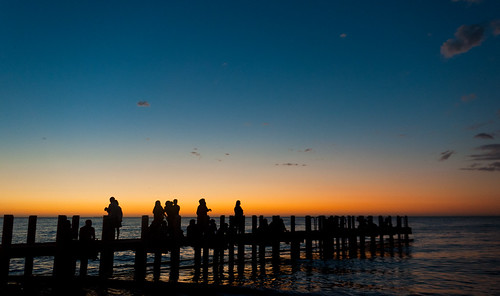
This then gave me another great shot.. The crowd on the Jetty, on dusk waiting for the show to being.

Waiting for the show #nyemelb

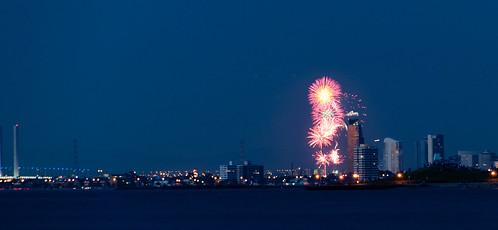
I had a rough idea of the camera settings I was going to be using… but as always the actual light at the time always change things.  The other big factor is wind.  A small breeze on the camera unless you have a very heavy tripod and a sandbag will give you camera shake.  Camera shake = ruined photo.  And this was a problem for me coupled with the choice of lens I made for the first of the evenings displays.  I only managed a few good shots.  Shots that were in focus, had a nice display of fireworks and didn’t have camera shake.

Let the Show Begin #nyemelb

EXIF on this shot…

Camera Nikon D90
Exposure 1.6seconds
Aperture f/8.0
Focal Length 200 mm
ISO Speed 200
Lens: Sigma 18-200mm f/3.5-6.3
Exposure Program Manual

I did attempt a few shots with my longer 70-300mm lens, but this lens (like the Sigma) doesn’t have Vibration Reduction (also known as IS or OS or VR ). With the slight breeze and the longer focal range, all of these shots bar a couple just didn’t work out.  So I knew that when I went back for the main event, I would take my trusty 55-200mm Nikkor VR kit lens.  Under 200mm was still going to give me the shot I wanted anyway. And every little bit helps as they say.

So after getting these shots it was a quick 10min drive home to download the shots onto the computer and see what I had via lightroom.  As much as I love the big screen on the Nikon D90, nothing beats looking at the shots on a 24″ 1920×1080 monitor to check for focus and clarity.  This one of the big advantages of going for the long shot, over the close up shot.

Now, I was ready, I could empty the card for the evening, make sure my battery was fully charged, that the remote was working correctly and the most important thing, that I was sober.  Taking good photos on New Years Eve does mean you will miss out on a few drinks.  A clear head is certainly required.

Back to the beach I went, 3/4 of an hour before the main event.  But unlike last time, there was no stuffing around trying to work out where to stand and what the shots would or would not look like.  Tripod was set up front row on the breakwater, so no one could stand in front of me, and I was ready for the main event.

And away I went.  I did some test shots over the city just before midnight, to make sure that the Exposure and Aperture were correct.  10 second count down…  and the show is on.

It is a great thing to watch, and that is what I did.  Using the wireless remote I didn’t have to touch the camera, just change focal lens a few times to get some different shots. Fire off some shots, quick look at the viewfinder, whilst still watching the show, fire off some more.. repeat.  10minutes is not long….

Get home, quick process to put up a shot just showing the event, then leave it for the evening…

Next day, spend some time in lightroom, delete the junk shots no point in keeping them… Then check all your keepers for white balance, crop, angle, sharpness, colour, e.t.c.  I ended up with 4 keepers that I have put up on Redbubble from that evening.

But this is the shot that most people seemed to love.

Midnight Fireworks in Melbourne #nyemelb

The EXIF Info:

Camera Nikon D90
Exposure 1.6seconds
Aperture f/4.5
Focal Length 102 mm
ISO Speed 200
Exposure Bias 0 EV
Flash No Flash
Date and Time (Modified) 2011:01:01 01:02:01
Exposure Program Manual
Date and Time (Digitized) 2011:01:01 00:04:58
Exposure Mode Manual
White Balance Auto
Focal Length In35mm Format 153 mm
Creator Tool Adobe Photoshop Lightroom 3.3
Lens Nikkor 55.0-200.0 mm f/4.0-5.6 VR

So as you can see from this overly long blog post…. a bit of thought and effort does go into these shots.

I hope you enjoy them as much as I did in taking them.

The versions on Redbubble, are all with different coloured fireworks and a different colour dominating the shot.  This is so that you can choose a framed print that has a colour that suits the space you are putting it in. ( and please do buy them 🙂 from  Redbubble ( it does help me buy more camera equipment ) )

( And the complete Flickr Set is here of all the fireworks shots plus the ones above. )
Behind the Exif: Bolt ( Lightroom Tutorial – Why I shoot Raw!)

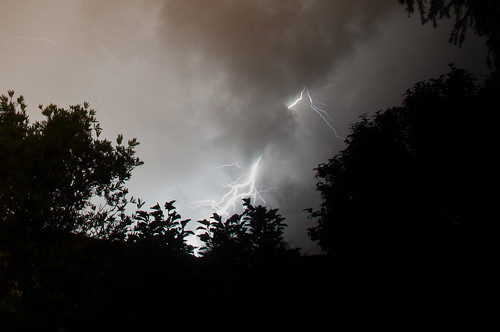
Remember my photo of the bolt of lightning from the other day, I thought I would show you how I went from the photo to the final image via Lightroom 3.3.

This also may help to show why I use Lightroom all the time for my post processing, and why I shoot RAW.

(All the images open in a new window, in lightbox mode )

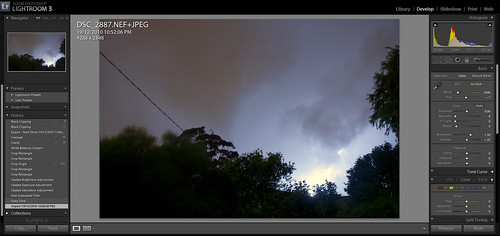
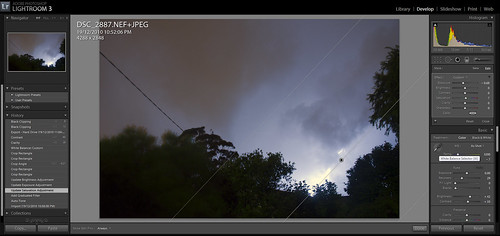
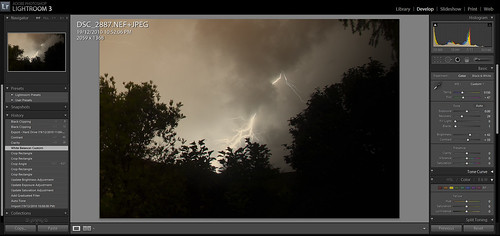
Stage 1: Opening the Raw file in Lightroom, which shows you the shot as taken.  On the large version of the image you can see all the details about the image.

1/8 - lighting-import-raw

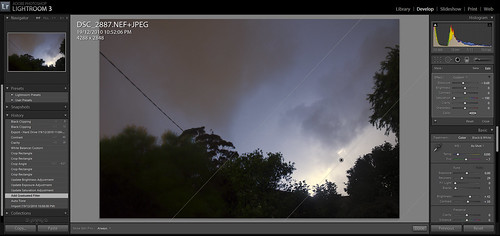
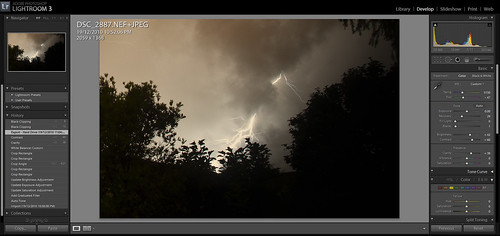
Stage 2: A gradient filter is placed on the bottom right hand corner, where the image is obviously over blown from the lightning bolt. ( You will notice a new box of controls has opened underneath the Histogram, which are the Exposure, Brightness, Clarity, Contrast etc controls just for the gradient ) I drew a gradient in the bottom right hand corner to deal with the lightning bolt only.

2/8 - lighting-add-grad-filter

Stage 3: This was a fix to the Saturation. The Graduated Filter always remembers the last settings it was on. So I needed to reset the values back to default settings, so then I could establish the baseline values I was after.

3/8 - lighting-filter-exposure

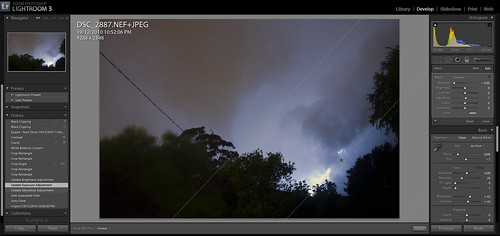
Stage 4: Dramatically under exposing this part of the shot, whilst on the gradient brought the bolt out of the background.

4/8 - lighting-final-filter-brightness

Stage 5: This was a change to the Brightness only on the gradient. This meant I could pull the corner of the image down from its over exposed values.

5/8 -lighting-finish-filter

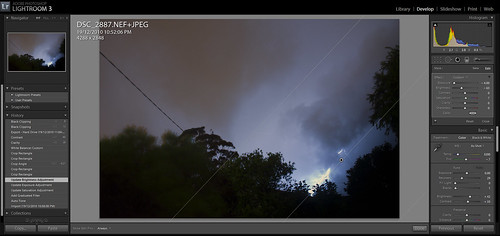
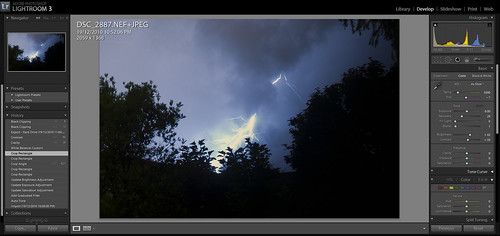
Stage 6: Cropping took the longest to get right. I wanted to pull the shot in for the most dramatic effect, whilst still having a large enough image.  Also I wanted to keep some of the foreground elements in place to frame the image. You may also notice the Histogram for the image is now a lot more balanced as well, post crop.

6/8 - lighting-crop

Stage 7: White balance is very easy to configure in Lightroom, via the eyedropper.  Moving the eyedropper around the image, you can see the change in real-time in the small preview window.  I went for a colour that was closer to reality from the clouds, than the lightning.

7/8 - lighting-whitebalance

Stage 8: A small tweak to the Contrast and Clarity of the image, just to bring the lightning bolt out and sharpen the image a bit. Then Export. ( I have a Flickr template set up, which is 1920px along the long edge and 72dpi )

8/8 - lighting-final

This took about 5 min to get right, most of which was playing with the crop. ( The shot was taken outside my house at 10:52,  then the time codes were 10:58 import, 11:04 export )

As you can see, shooting with RAW, meant that I got a good photo out of what would have been a bad JPG. My only regret is that I had to crop to much, but that was the weathers fault, not mine ( well I am blaming the weather ).

The EXIF info:

Camera Nikon D90
Exposure 30
Aperture f/11.0
Focal Length 18 mm
ISO Speed 400
Exposure Bias 0 EV
Date and Time (Original) 2010:12:19 22:52:06
Date and Time (Modified) 2010:12:19 23:04:58
Exposure Program Manual

And the final Shot…..

Bolt

Ten of my fav shots of 2010

In no particular order….. with a few details on why I choose each of them.

Of course, I will walk away from this blog post, and go… oh shit, what about x or y…  but these are the stand outs for differing reasons.

But one thing these shots have in common is getting out there.  Sitting behind the computer may get you a few shots, but going out in the rain, the heat, the crowds, the isolation will get you the good photos.

10,000 Meters

10,000 Meters

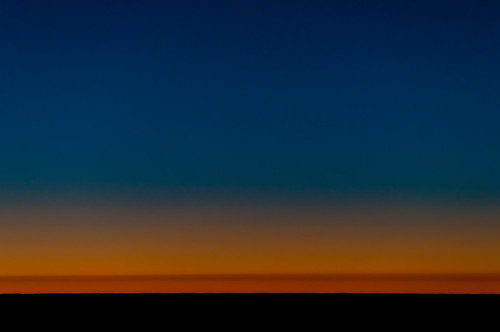
Taken from an aircraft window, the colour for me tells the story.  This is one of my no subject matter shots, that says photography is still art.
Buy this at Redbubble

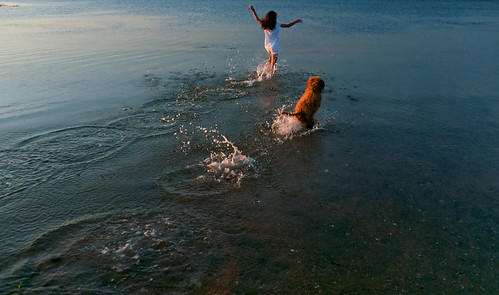
Freeeeedom

Freeeeedom

Taken at Brighton Beach, this shot for me is about fun, summer and expression. And a lot of luck to get all the elements and the camera in play at the same time.
Buy this at Redbubble

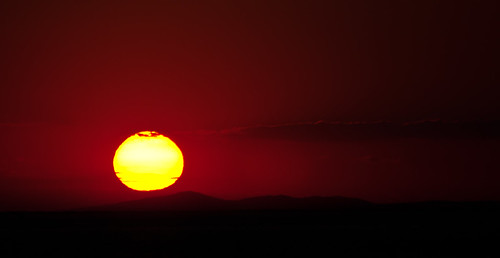
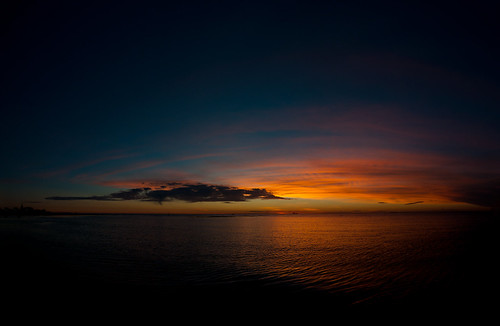
The end of 10

The end of 10

Oh so many sunsets to choose from….  This one has it all, the light, the colour, shapes and silhouettes.
Buy this at Redbubble

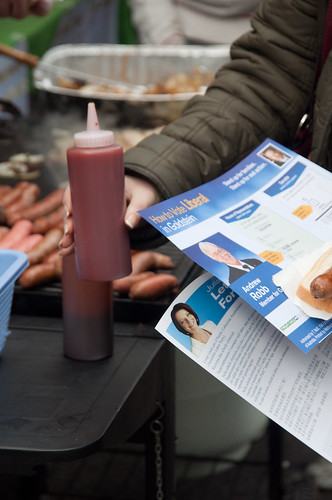
Voting in Australia

Voting in Australia #snagvotes

I was really pleased with this shot, one a quite a few, trying to capture what Voting in Australia really means.

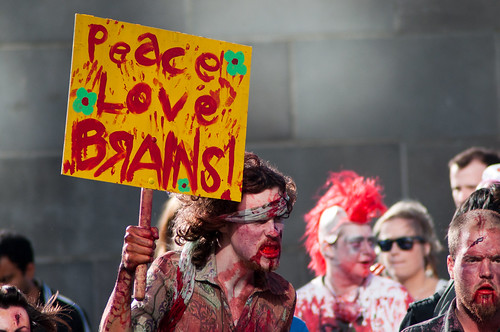
Peace Love Brains

Peace Love Brains

For the life of me, I have no idea how I got the lighting on this shot so right. Taken at the Melbourne Zombie shuffle.

We Shall Remember them

We Shall Remember them

This is the first dawn service I have got up for in quite sometime.  One of the hard things, was trying to find a place to get a photo from, due to the crowds.
Buy this at Redbubble

Some people are just born Republicans

Some people are just born Republicans

Taken the day after I got my new 300mm lens, this is a still photo as a story.

The Way Home

The Way Home

Still one of my all time fav shots. This shot is a what the camera see’s, not what I saw.  And is the shot I was aiming for. I could see all the details in the dim light, I set the shot up to remove them and it worked.
Buy this at Redbubble

Closing up for the Day

Closing up for the Day

The depth of field and colouring in this shot all just sat together perfectly for me.
Buy this at Redbubble

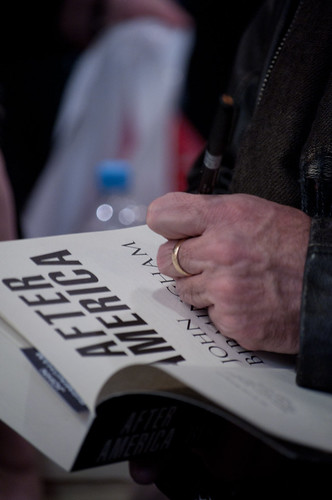
@JohnBirmingham signing his new book After America

@JohnBirmingham signing his new book After America (Close up)

I was trying to get a photo of John, but one that told a story, not just a “fan” photo. This I felt was the essence of why he was where he was at the time.

Missing from the Exif: Sometimes the light is perfect

Magic hour, the hour around sunrise and sunset is called that for a reason.  The best light can be found when you have  a touch of luck and a lot of patience.  This shot was taken from what was a fairly average sunset.  But instead of putting the camera away and heading home, I stayed out for another 30 minutes, to grab the last touch of light.

In taking this shot, I wanted the whole sky, even with my 11-16mm Tokina, I still didn’t feel I had the whole sky.  Thus I went for the panorama.  When lining up the shot, the one thing I did notice, standing on the foreshore was the small waves lapping on the shore.  When trying to line up a panorama, waves are just a path to heart ache.  So I walked out till I was thigh deep in the water, passed the lapping waves.

This is a handheld panorama of about 10 shots, with a lot of overlap.  When shooting panorama’s always shoot in manual mode.  That way, when the shots merge, you will have consistent levels across each shot. Checking one shot that balances the light and dark will mean that your levels will be averaged out. The final image is 6335 x 4133 ( compared to 4288×2848 from the D90 )

Also this was one of my first sunset walks with the new GPS, but for some reason, my GPS decided I was 10 meters above sea level.

Camera Nikon D90
Exposure 0.004 sec (1/250)
Aperture f/6.3
Focal Length 16 mm
ISO Speed 250
Exposure Bias 0 EV
Flash No Flash
Date and Time (Modified) 2010:12:04 21:56:54
Exposure Program Manual
Date and Time (Original) 2010:12:04 20:44:05.00+11:00
Date and Time (Digitized) 2010:12:04 20:44:05
Max Aperture Value 2.8
Custom Rendered Normal
Exposure Mode Manual
White Balance Auto
Focal Length In35mm Format 24 mm
Image Number 87921
Lens 11.0-16.0 mm f/2.8
GPS Version ID 2.2.0.0
GPS Latitude 37 deg 54′ 57.54″ S
GPS Longitude 144 deg 59′ 8.35″ E
GPS Altitude Ref Above Sea Level
GPS Altitude 10 m
GPS Date Time 2010:12:04 09:44:02Z
GPS Satellites 10
GPS Img Direction Ref Magnetic North
GPS Img Direction 8.3

( Linked image is to lightboxed version as well, which looks much nicer )

Sometimes the light is perfect

And you can buy this as a print from RedBubble as well

Yeah… am a finalist in a real comp…..

They say being Nominated is an honour… well for me it is….

the below photo has been short listed in the Flickr Getty Images Grab Comp. ( See the other finalists here.. http://bit.ly/gO8d8R )

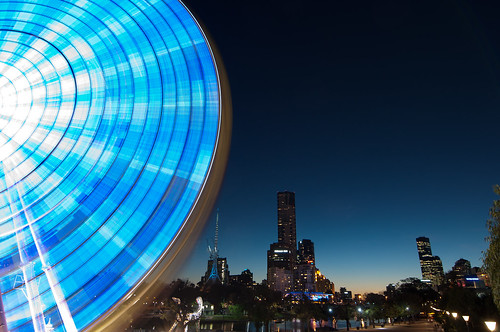
Blue Evening Ride

This one one of my evening wandering shots around Melbourne, whilst Mrs Wolfcat was in her art class.

Taking this shot was surprisingly hard.  The bridge that you stand on to get this view gets a very nice bounce when people walk on it.  So even an 8 second exposure means you have to check that people aren’t coming on the bridge at the same time.  I chose this shot over the others I took that night to put up as it managed to get its own story with the blue.  As the Ferris wheel moves it cycles through colours, so there was more than a touch of luck in this shot getting the last of the blue in the sky and the wheel at the same time.

For those that were wondering the EXIF behind the shot:

Camera:  Nikon D90
Exposure: 8 Seconds
Aperture: f/9.0
Focal Length: 15 mm
Lens: Tokina 11-16mm f2.8
ISO Speed: 250
Flash: No Flash
Exposure Program: Manual

I’m not sure of the opening times, but all twenty finalists, but it should be on display at the Challis Studios, 29 Challis Ave, Potts Point NSW 2010, from Dec 2.

And of course you can buy this image at Redbubble as well….


Missing from the Exif: La La Falls/The Falls

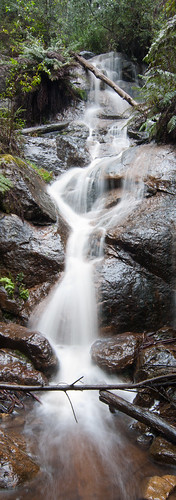
The FallsThese are basically the same shot, so I can get a two for one deal on this post.

Sometimes when you are out taking photos, it does pay to follow your heart. Or in this case, the car in front of you. Having driven up to the Upper Yarra Dam, to get shots of it filling up nicely, and to act as reference shots if the dam does reach the spill way, I got stuck behind a car coming back. And when the car in front of you slows down on the corners and speeds up on the straight stretches, you know you going to get frustrated.

This is what happened to me most of the way back. But being on the lookout for photos anyway when I saw an opportunity, I took it. Having never seen the sign for La La Falls before, I saw the sign and went… hmmm, water fall… hmmm, lots of rain, hmmm, waterfall will be working. Ironically, the slow car in front of me had the same destination in mind. So after stalking them through the back streets of Warburton, we ended up at the same car park.

At the carpark you are faced with a sign.. “3.5km return: Moderate”. So a quick phone call to Mrs Wolfcat, to inform her that I was traipsing off into the bush was in order (Always let people know where you are going). So camera in hand and my tripod over the shoulder into the bush I went. Of course a Moderate track after 70mm+ of rain, isn’t quite as easy as it would be in the dry. But I made it up. (Note to Self, must get fitter ).

So back to the photo, knowing I was going to photograph a waterfall, I had taken the tripod with me. If you are going to shoot waterfalls a tripod is always a must if you want water blur. The other thing that is a good part of your kit are some ND Filters so you can shoot longer exposures during the day. Lucky for me, as I don’t own any, was the fact it was very dull and overcast and the surrounds of the waterfall were in a deep gully.

A quick succession of test shots, 1/10th , ½, and 1 second exposures to get the right water effect and I was happy. I could shoot at F22 ( the minimum aperture on the Tokina 11-16mm lens ) at 1second and not over blow the shot. I tried about 50 shots whilst I was there, and walked away with two I was happy with.

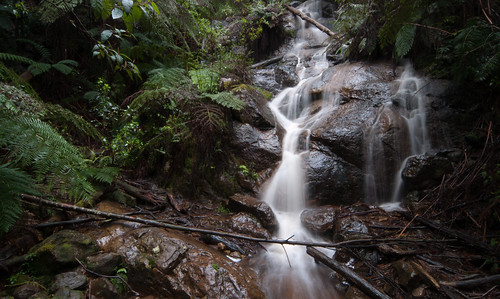
One is a crop of a portrait shot, to create a vertical panorama. The other is the more typical landscape shot. The shots were geotagged with Geosetter when I got home and minimal post processing in Lightroom 3.

I was happy with both of them. So the moral of the story is, follow your instinct, or at least the car in front of you to get a good photo.

Camera Nikon D90
Exposure 1
Aperture f/22.0
Focal Length 11 mm
ISO Speed 100
Exposure Bias 0 EV
Date and Time 2010:10:31 20:56:35
Exposure Program Shutter speed priority AE
Focal Length In 35mm 16 mm
Scene Capture Type Standard
GPS Latitude 37 deg 46′ 32.67″ S
GPS Longitude 145 deg 42′ 28.05″ E
GPSAltitude Ref Above Sea Level
GPSAltitude 482 m
Lens 11.0-16.0 mm f/2.8

And the Landscape Version:
La La Falls

Of course both of these are on Redbubble as well

Click here for the Vertical Shot and Here for the Landscape Version

Missing from the EXIF: 10,000 Meters

I’m a window seat kind of guy.  Flying doesn’t bother me at all.  I can watch a plane crash doco and get on my flight straight away no probs.  Most of the time the Taxi ride to and from the airport is of more concern to me than any flight.  But the trick with being a window seat person is to know which window seat.

That not only includes front or back of the plane, close to the wing or not, but also where is the sun. The time of the day of the flight and the location of the sun define where I will sit on most flights.   As a rule I try for the sun side of the aircraft if flying early morning or evening.  Why, because that is where the light is.  Sunrise gives you the standard sunset, but also the low angled light on farm dams and other small water courses.

And Sunset.  Sunset from an aircraft it just magical.  But you need to be aware of the plane you are flying on, are you close to the wing, so that it will in every shot, or far enough forward or back you can choose.  Sometimes a hint of wing is great in a shot, helps to act as a framing device and places the shot in context.

Most of the time I fly, I have my Sigma 18-20mm lens on. With only a UV filter. Forget taking a polarising filter on the aircraft, it will only show up the layers in the windows of the aircraft and as a general rule ruin most of your shots.

This shot was one of a few hundred I took on the flight, playing with the fading light, the reflections on the window, and tweaking the shutter speed to the slowest that I could hand hold on a moving plane, whilst holding the camera about 2mm from the window. Close enough to not get reflections from the cabin, and not to close as touch the vibrating window.

As for post production there was just a slight tidy and noise reduction in Lightroom3 and because Lightroom3 has lens corrections, I fixed the corner lens curves as well.

( and yes the shot was not taken at 10,000 meters, it was just over 11,000 but artistic licence in titles is allowed 🙂 )

And there are photos that need just colour to tell a story.  I’d like to think this is one of them.

Of course when someone left a comment saying my shot reminded them of a Murray Fredericks photo, I was of course thrilled.

10,000 Meters

And the EXIF data.

Camera Nikon D90
Exposure 0.02 sec (1/50)
Aperture f/6.3
Focal Length 200 mm
ISO Speed 1600
Exposure Program Manual
GPS Latitude 36 deg 48′ 13.45″ S
GPS Longitude 146 deg 51′ 19.35″ E
GPSAltitude Ref Above Sea Level
GPSAltitude 11421 m

And of course you can buy this as a print from Redbubble as well.

Missing from the EXIF: Race You…

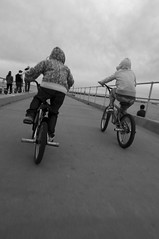
Race you....This is actually an older shot of mine, but one that I have come back to.  It’s been entered into a comp, and looking at it some more thought it would do well to have a bit of an explanation behind it.

Firstly, this is from last year in fact from the first weekend I had my Tokina 11-16mm lens. So being the first weekend with a new lens it was going to be the lens that would be on the camera.  Now the lens isn’t on the camera by default but is always in my bag.  Because it is great for getting these low angle shots especially in dull conditions.

One thing about this shot, is that it was on manual settings. And only luck meant I got the shot.  I do try and always put the camera back on Auto:No Flash after taking photos, so that I can just grab a shot.  Luckily for me, the previous settings for shots taken 10 min before hand worked. When ever I carry my camera I try to have in my hand so I can get the improve shot.  This is one of those.  I had turned to see the kids coming passed me on their bikes and fired off about 10 shots as they went passed.  The camera was at waist height and they would have been totally unaware of me taking the photos.  This helps when taking shots to get a natural look and feel especially from your subjects.  When using a wide angle lens try shooting from the hip as it were.

So this shot has a bit of a dutch angle, which works and autofocus grabbed part of the bike which was also very lucky.

The other big advantage of this shot is that all the subjects in the shot are completely anonymous which then gets rid of a lot of hassles about getting rights for publication or even entering the shot into a competition.

So here is the EXIF and I hope you like the shot.  Remember you can shoot from the hip and still get a great shot.

Camera Nikon D90
Exposure 0.008 sec (1/125)
Aperture f/6.3
Focal Length 16 mm
ISO Speed 320
Exposure Program Manual

And you can buy this image on Redbubble here

Missing from the Exif: Express on the Caufield Line

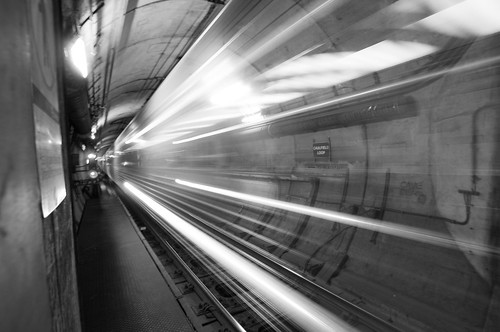
I should have titled this… how to take photos in places your not allowed to.  See the whole City Loop system is under the control of private enterprise and like every other railway station you are not allowed to take photos of trains from the platform in Melbourne.  You can apply to get a permit to do some of the stations, but the underground is very frown upon.  <rant>See terrorists only use high res DSLR’s to take photos… never do they just use a camera phone or a hidden camera.  So if you have a DSLR you are obviously a terrorist. </rant>

This was taken at Melbourne Central one evening heading home after a few drinks. If you are going to shoot in places like this, never have a tripod that will get attention drawn to you very quickly.  But it is possible to get a shot like this (1.3 seconds exposure) hand held if you brace the camera, and always hold your breath, for that extra bit of stabilising.  In this case it was resting against the wall.

I shot this with my Tokina 11-16mm lens to get the whole tunnel in the wide shot.  This helped to get the sense of claustrophobia that is in the tunnel as well.

The next thing is to wait for the right moment.  You can feel a train coming a minute before hand and I managed to squeeze of a few shots just to get my levels about right before the train came. The start of this exposure can be seen just before the Caulfield Loop sign (click through to see the bigger version).  During the exposure the first carriage of the train moved completely out of shot.  This gave me the lines of movement that go right to the edge of the frame.

This is one of those one shot wonders. To get these lines that I have you can only do on the first shot from the headlights of the train.  That is why you should always try and get your levels right before hand for the background, remembering to compensate for the light that the moving object will create as well.

Turns out this is currently my most favoured and commented on shot both on Fickr and Redbubble. Hope you enjoy it as well

Express on the Caufield Line

Camera: Nikon D90
Exposure: 1.3s
Aperture: f/5.0
Focal Length: 12 mm
ISO Speed: 400
Exposure Bias: 0 EV
Flash: No Flash
Exposure Program: Manual
Date and Time (Original): 2009:09:14 21:27:22.00+10:00

And you can buy this print here at Redbubble

…..

Details re Photography from Metro Melbourne.

To obtain a permit and see all the t&c go to
http://www.metrotrains.com.au/About-us/Photography.html

Point 18: This permit is NOT valid for photography at the City Loop Stations (Parliament, Flagstaff and Melbourne
Central). Photography is NOT permitted at these stations.

Missing from the Exif: Partial Lunar #eclipse Melbourne 1

This shot has been very popular on both Flickr and Redbubble so I thought it would be a good one to do a quick post on.

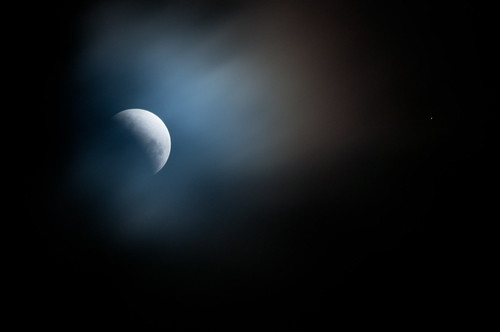
This shot is really about serendipity. Sometimes you plan a shot and mother nature well just gets in the way.  Over a huge chunk of the world we were treated to a partial lunar eclipse on Saturday the 26th of June 2010.  Now I knew this was coming and I knew even with my 300mm lens I’d be able to get a decent shot.  What I did count on was the weather.  With the eclipse due from 8:30pm that night I watched the sky and the radar to see a thick band of showers move in from 5pm.  Sure we need the rain in Melbourne, what I didn’t need was the cloud cover.

But in true spirit I didn’t give up.  I kept going outside every 10min to check the cloud cover… nope still 100%, and damned cold.  Back inside… repeat.  Then as we neared the maximum coverage of the eclipse the cloud broke just.  I had about 5min of sky where I could see the moon.  Of course the cloud kept obscuring the sky and the view was not 100%, but those lack of ideal conditions made the shot IMHO.

Lots of people got a nice clear shot of the moon around the world, but I was lucky to get a shot with real atmosphere.  And for once I was glad the weather was not perfect.  Also you will notice that the shot is not at the full 300mm. This was so I could get the star in the shot as well, which lent a bit more interest to the shot.

So remember even if it is cold, miserable and you think you are going to miss the photo you had planned, stick with it, you might just get a better shot.

Partial Lunar #eclipse Melbourne 1

Camera: Nikon D90
Exposure: 1 Second
Aperture: f/8.0
Focal Length: 270 mm
ISO Speed: 200
Exposure Bias: 0 EV
Flash: No Flash
Exposure Program: Manual
Date and Time (Original): 2010:06:26 21:31:39.00+10:00

And you can buy this image from Redbubble here