Entries Tagged as 'Missing from the Exif'

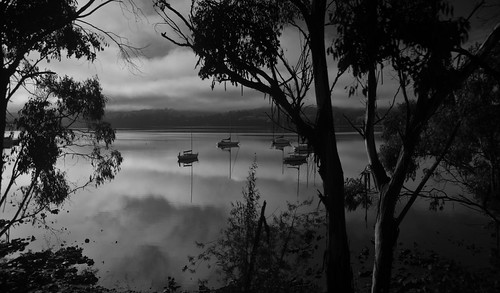
missing from the EXIF – Hidden Cove

This is going to be kind of a short one…  and one I hope will surprise a few people…

This shot is from my recent sojourn to Tasmania.  We had a few days in Hobart and decided to do something different, and something that wouldn’t cost a fortune  (of course if more of you brought my prints…. but aside).  So the plan became do a day trip down to Geeveston down in the Huon Valley.  We have toured Tasmania extensively but still hadn’t made it down that part of the island and there is a very affordable public bus that goes down there, $40 for a whole day excursion for two people is damned cheap in my books.

So the bus leaves town at 8:30am and we head down the coast.  (Can you see where I am getting at….) It is a beautiful sunny/foggy morning in Tasmania and what do I do… I grab a window seat, tweak the polarising filter to cut out some glare, dial the camera to Sports Mode and start shooting.  Yes this shot was done at 80kph! out a bus window. It was one of 4 that I took as we rounded a bend where the sun was not shining on the bus so there were no reflections and that Cat said “Now” to.  She called out the gaps in the trees so I could keep shooting and not waste shots on trees and powerlines.  So there you go…   you can shoot fast if the location and the camera settings are right.

Hidden Cove

Camera: Nikon D90
Exposure: 0.001 sec (1/1250)
Aperture: f/4.5
Focal Length: 18 mm
ISO Speed: 400
Exposure Bias: 0 EV
Flash: Auto, Did not fire
Date and Time (Digitized): 2010:05:21 09:37:30
Subject Distance: 4.73 m
Focal Length In35mm Format: 27 mm
GPS Latitude: 43 deg 8′ 52.56″ S
GPS Longitude: 146 deg 58′ 40.13″ E
GPSAltitude Ref: Above Sea Level
GPSAltitude: 6.25757575757576 m
GPSDate Time: 2010:05:20 23:37:30Z

And yes this image is on RedBubble for purchase as well

Behind the EXIF – Ripples

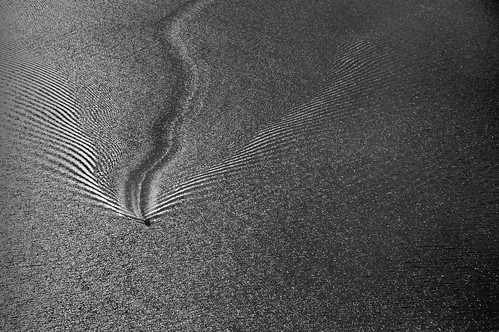
This Behind the EXIF is my shot from the weekend that covers why you need to enjoy and experience first (then take photos) and what the photographer sees is not what others do.

As a birthday present last year I was given a Trial 30 Minute flight, which is one of those things that first exhilarated me and secondly scared the crap out of me. I’m not afraid of flying by any measure and have been in small aircraft a lot of times, but to actually be flying it that is another matter.

So first things first I set out to enjoy the flight and make the most of the time in the air getting to fly the plane. All the shots I took were at the end as the pilot brought the plane into land.

Being late in the afternoon the sun was at that special angle where the light of the still water was nearly a mirror.

Technically the shot was on Auto No Flash and nothing more. I wanted to get some shots not spend time on the camera. I spotted the boat quite some distance away and knew that this was the shot I wanted.. not just and suburbs from the air.

It wasn’t until I got home I realised that I had made a beginners mistake. On friday night getting shots on the new AAMI Park stadium I had dialled up a autoshot in the rain, but pushed the ISO to 640 and the Nikon D90 doesn’t take the ISO back to auto when you go to Automode.

What this meant was that the all the shots that I took were basically to bright. The series of shot I took of the boat and water were all suffering from the same issue that the water was to bright and the shot was blown out.

As a result this is one of the more processed shots in Lightroom as well, with a crop on the left hand side to remove part of the water that was completely blown out, and then two horizontal gradients in Lightroom. The left hand gradient to darken the shot and the right hand one to lighten the shot. Then a lot of juggling to balance the overall shot with the aim of keeping it as natural as possible.

This shot has been interesting to see on flickr for what people thought it was…. which I still have trouble seeing. The first reaction of people is that it is lines in sand, not a boat on water. Which also goes to show you that the viewer of your art will never see what you did.

I am very pleased with the overall result and hope you are as well.

Ripples

The EXIF Data

Camera: Nikon D90
Exposure: 1/3200 sec
Aperture: f/14.0
Focal Length: Sigma 18.0-200.0 mm f/3.5-6.3
Lens 116 mm
ISO Speed: 640
Flash: Auto, Did not fire
GPSVersion ID: 2.2.0.0
GPS Latitude: 38 deg 2′ 47.32″ S
GPS Longitude: 145 deg 6′ 26.35″ E
GPSAltitude Ref: Above Sea Level
GPSAltitude: 297.605922551253 m
GPSDate Time: 2010:05:09 05:31:54Z

And you can buy this image on Red Bubble here

Missing from the EXIF – Spitfire Ready for Take off

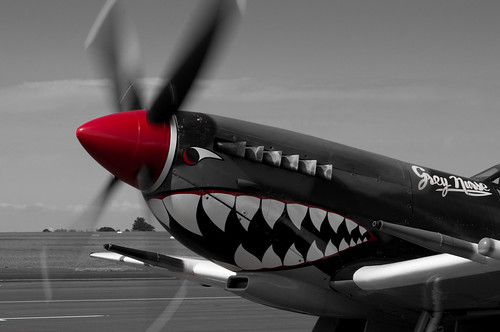
Time for another behind the EXIF data post…. This time taking just one of the shots of the Mark VIII Spitfire at Point Cook.

Firstly, Point Cook RAAF Museum do what they call Interactive Flying Days every Tuesday, Thursday and Sunday at 1pm, so there is always one plane flying at the museum on these days.  Put that info in your diaries now if you are a plane spotter and either live or are coming to Melbourne.  I knew in advance that the Spitfire would be flying this day (by phoning the Museum they can often tell you up to a month in advance what planes will be flying).  Note there is very limited public transport to Point Cook, so far easier to drive out or get a lift from someone.

So once again like my last post a bit of research never goes astray.

The Spitfire is one of those must see aircraft – to see flying whilst you still can.  The purr of the Merlin Engine is one of the sweetest sounds you will ever hear.  Great aircraft like the Spitfire come to life when in motion, the pilot on the day describing the Spitfire as a temperamental race horse. Even if you’re not a plane spotter you’ll still love the sound and vision as the Spitfire goes screaming over head.

Sorry back to the photo…

I had my standard kit that I usually carry with me but could have just taken the D90, a fully charged battery some spare SD cards and my Nikkor 70-300mm, (because that’s all that I used).

The interactive day consisted of the pilot talking about the plane and what he was going to do, then a 10-15min flight followed by the pilot returning for questions and answers.  My shot was taken just after the intro as the Spitfire was warming up before taxing off.

The reason I only have a few in flight photos up on Flickr is that the lens is crap at doing panning shots with any movement at the longer end.  I have the non VR version and whilst it is great at steady long shots… get a long lens with VR if you are going to shoot planes in the air.  On my possible to-buy list is the new Sigma 50-500mm OS when it comes out and I have a spare $1500 or so… until then ground shots mainly for me.

I had two spots I could take photos from… one up high over the heads of people to get the in-flight shots and one where I could get right up close to the plane.  This shot was taken from the second of those spots.  As the plane takes a few minutes to warm up I could also try a number of settings to find the sweet spot especially for the prop blur effect I was after.

When trying to get a partial blur on the prop, the trick is to use a slow shutter speed of around 1/125 to 1/250.  Obviously if you want the prop to be a complete haze in front of the aircraft slow the shutter even more.  And if you want a frozen prop use a faster shutter speed.

With high speed jets you’ll want a fast shutter speed around 1/1600 to get the vapour off the wings during high speed banking, like this shot of a F-18 Hornet

The tone dropping was done in Photoshop CS4, even in the coloured shot the red of the prop and sharks mouth stood out so well that in my eyes this treatment just suited the shot naturally. This other blog post I did has the details on how to do the effect – Tone Dropping in Photoshop in 7 easy steps)

Ready for Take Off

And the EXIF Data.

Camera: Nikon D90
Exposure: 0.008 sec (1/125)
Aperture: f/18.0
Focal Length: 70 mm
ISO Speed: 200
Exposure Bias: -11/3 EV
Exposure Program: Manual
Date and Time (Original): 2010:04:01 13:18:11.00+11:00
Subject Distance: 7.08 m
Metering Mode: Multi-segment
White Balance: Auto
Focal Length In35mm Format: 105 mm
Scene Capture Type: Standard
Gain Control: None
Contrast: Normal
Saturation: Normal
Sharpness: Normal
Creator Tool: Adobe Photoshop Lightroom
Lens: 70.0-300.0mm f/4.0-5.6
GPS Latitude: 37°55’49″S
GPS Longitude: 144°44’59″E

I was also trying to find the essence of the Spitfire in one shot and this really captured it.

This shot is also For Sale on Red Bubble.

Missing from the Exif – First post

Thought I would add the some of the stuff from photos to my blog, the sort of stuff that you do not find in EXIF data… the stuff that really makes a photo.

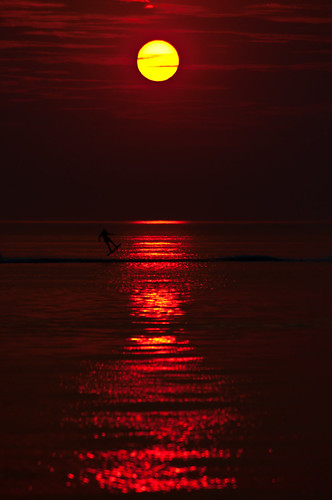
First cab of the rank so to speak will be my sunset photo from the other day…. of course if there are flickr photos you want the story behind, just drop me a line.

The basic shot was planned 3 hours before hand, when I noticed the smoke around the city from the series of burn off’s that the DSE was conducting that day.

Now smoke in the atmosphere will ALWAYS give you a red sunset. And if the smoke is thick enough, you will be able to see the whole disk of the sun with the naked eye, let alone needing ND Filters.

So I know it is going to be a great sunset, so I get home from work grab all my gear and head to my favourite place where I know that I can get the sun setting over water every time. Before I go however I have I quick scan over my flickr sunset set just to make sure I have the approx F Stops and Shutter speeds for similar photos in my head.

When I got to my location, I like always fired up the GPS on my phone to create a log file so that I can tag the photos… and because I am shooting the sunset swap to my 70-300mm lens. I’m after the sun as big as I can get in the shot (well at least very large, so am looking at the 200mm+ range)

Also I have my Hoya 62mm Circular Polariser on my lens. Now I have the cheap 70-300mm which has the problem that the front element rotates on focusing, meaning that you have to tweak the Polariser every time focus changes.

So that kind of covers the technical side of things… then that bit of luck comes into play. There was a boat with a wake boarding moving up and down the bay right opposite the outcrop I was standing on. This shot was the 4th shot I took of them.

As this shot is all manual, this is what I did. I took a practice shot of the sunset to make sure that the colour and lighting were correct. Then as the boat passed left to right I got a focus lock (single point – centre left) on the wake board rider. This gave me the opportunity to check that the first time they went passed that I could get the shot I was after. By now I already knew how far they would travel and when the return trip would be.

Next is that moment of fear… will they pass through my shot again… will they fall off, will they do something unexpected.

Lucky for me…. They didn’t… it all went to plan. I’d also put the camera into highspeed burst mode so that I could shoot more frames that I needed to capture the action. Given that it took the rider less than a second to pass through the sweet spot of the image I wanted to give myself every chance. As the rider got close to the the sun I made sure that I had focus lock on him and just panned the camera as he moved from right to left.

The biggest piece of luck however was when the rider decided to jump. Just before the reflection of the sun from my point of view.

So that is how I fill a blog post writing about a lucky image that took a lot of understanding to get.

So look at the EXIF data of peoples shots to see how the shot was done.. but really… look at the photo and that will tell you how it is really done.

(also you will find this image on Redbubble, with the Lat Long on the final image, where you can buy it from a post card to a framed print)

(oh nearly forgot)

Here is the EXIF Data:

Camera: Nikon D90
Exposure: 0.002 sec (1/640)
Aperture: f/5.6
Focal Length: 200 mm
ISO Speed: 250
Exposure Bias: 0 EV
Exposure Program: Manual
Date and Time (Original): 2010:03:25 19:12:24.00+11:00
Metering Mode: Multi-segment
Exposure Mode: Manual
White Balance: Auto
Digital Zoom Ratio: 1
Focal Length In35mm Format: 300 mm
Scene Capture Type: Standard
GPSVersion ID: 2.2.0.0
GPS Latitude: 37 deg 53′ 57.12″ S
GPS Longitude: 144 deg 59′ 2.35″ E
GPSAltitude: 9.5 m
Creator Tool: Adobe Photoshop Lightroom
Lens: 70.0-300.0 mm f/4.0-5.6