Entries Tagged as 'Media'

Missing from the Exif: On the Edge of Night

Sorry for the lack of updates… between a new job and a new lens… hazahh… I’ve not spent much time behind the computer…. So here is a post based around a shot I always wanted and the new lens.

One of my favourite shots of the the setting sun, is the melting on the horizon version.   The one with the full disk of the sun visible through the long light, and just at the point it is touching the horizon, with the extra distortions that the atmosphere gives the shot.

When I first got my Nikon D90 DSLR, it came with an 18-55 and a 55-200mm lens kit.  All very nice, but 200mm still meant I had to crop a lot on the image to get the focal point out of the shots I was taking.  Next was my 70-300mm.  Much better… but still to much cropping on a 12megapixel image to pull the shot I wanted.

Finally I got my Sigma 150-500mm.  For two weeks after I got it, I was running down to the beach at sunset.  And every evening I either had something on at sunset, or as was the main case, a beautiful sunny day would turn cloudy at the last min, or the line of cloud 15degrees above the horizon would still be there.

Now I am lucky I live 10min drive from the water and that the sun sets over Port Phillip Bay in Melbourne for me.  To be honest I am not a morning person, so having to get up at 5am for the shot wasn’t going to happen.

Finally, I get the cloud cover I want, and the major bit of luck the atmosphere I wanted.  It is always hit and miss with sunsets as to what you will get, if the sun will slide cleanly into the water, or play nice optical tricks in that last few min before it sets.  Here I got that balance.

This is a hand held shot, although a tripod for the sunset does make life much easier, even though you have to tweak the position of the camera on the tripod as it will move a few degrees as it sets.

This is a touch of patience and a touch of luck, combined with a 500mm lens.  I hope you like it as much as I do.

On the Edge of Night

The EXIF Data:

Camera Nikon D90
Lens Sigma 150-500mm F5-6.3 APO DG OS
Exposure 1/3200 sec
Aperture f/9.0
Focal Length 500 mm
ISO Speed 160
Exposure Program Manual
Date and Time (Digitized) 2011:01:29 20:34:01
Digital Zoom Ratio 1
Focal Length In35mm Format 750 mm
Scene Capture Type Standard
GPS Altitude Ref Above Sea Level
GPS Altitude 5 m
GPS Date Stamp 2011:01:29
GPS Latitude 37 deg 53′ 54.11″ S
GPS Longitude 144 deg 59′ 4.98″ E

It was also featured on the RedBubble Home Page… ( Click on the link to buy the image )

On the Edge of Night

11mm to 1000mm a slideshow

Flickr Gallery showing every lens combo I have from 11mm on my Tokina 11-16mm lens to my Sigma 150-500mm. ( updated with a 1000mm shot thanks to my 2x Kenko Teleconverter

Shows you the range that you can get with just a few key lenses in your kit. – The Distance to Eureka Tower ( the tall building I zoom in on ) is approx 8.5km as the crow flies.

Best viewed full screen.

( and for those who are on non flash enabled I thingys…  go to the Flickr Set here )

All Shots were taken on Manual Settings:

Camera Nikon D90
Exposure 0.001 sec (1/800)
Aperture f/9.0
ISO Speed 200

Lens used in order were

Tokina 11-16mm, Nikon 18-55mm VR, Nikon F1.8 50mm,  Nikon 55-200mm VR, Nikon 70-300mm, Sigma 150-500mm, with each lens taking a shot at both ends of its range.

Shots are not taken for aesthetic value, and neither did I have a proper tripod set up to ensure that the shots were perfectly lined up for focus point. ( A decent tripod is next on the list of things I need to buy )

Update

the 1000mm shot is taken in Automode on a D7000 a year later than the above shots from the same location care of a 2x Teleconverter.  The haze in the shot shows the limitations of long shots as well.

Missing from the EXIF: Lightroom Tweaks to Midnight Fireworks

This post shows how I created this image via all the processing in Adobe Lightroom 3.4 ( The previous blog entry Missing from the EXIF: Midnight Fireworks covers the details of the actual shoot itself )

Most of the processing was done when I got home from the fireworks show, with only additional cropping the next day before it became the Redbubble version of the image.

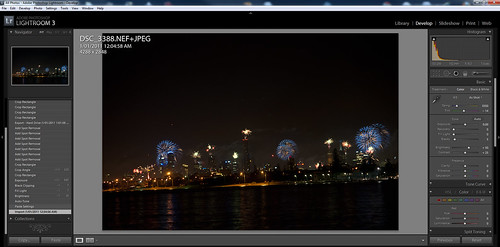
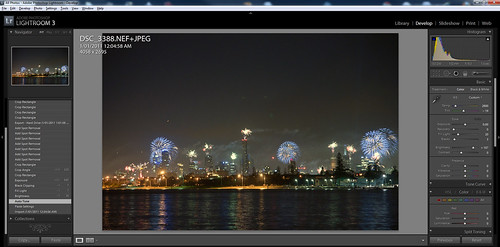
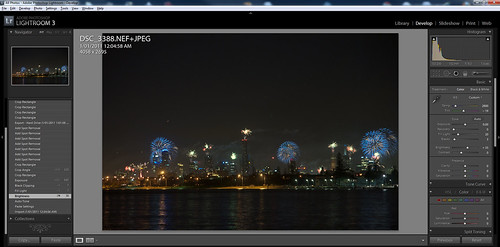
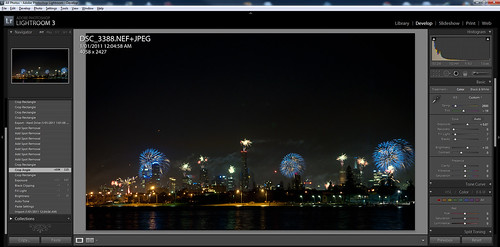
Each of these images opens into a new tab/window, in Flickr Lightroom mode so you can see all the details.  These are untouched screenshots, so that you can see the whole process I went through.

This covers from 12:54:56am when I opened imported the image to Lightroom, to 1:01:58 when I exported the image for uploading to Flickr.

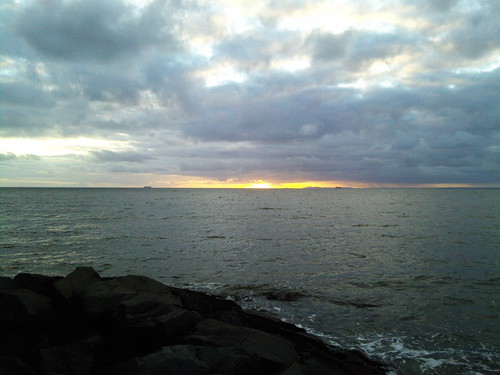
Stage 1: The Raw Image.  Shoot RAW, if you shoot JPG once you start pushing an image you will run into its limitations.  RAW as the digital negative is way more forgiving.  Further as Lightroom is non-destructive on your RAW files, you can tweak till your heart is content, and still go back to the original if ( in my case when ) you go to far.

Midnight Fireworks in Melbourne -Stage -import

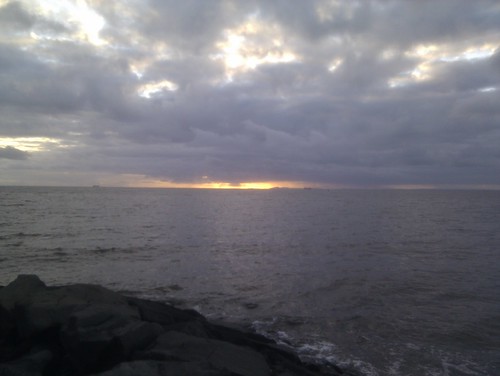
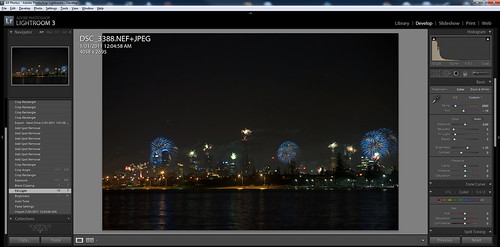
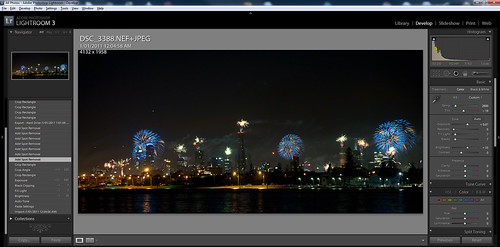
Stage 2: Rotate and White balance. – As all the images from the start of the show to the finish were in the same light, and the camera was fixed to a tripod, I tweaked one image quickly for rotation and balance.  Then in Lightroom, copied only those develop settings, then pasted them to all the images. ( Batch processing even small parts of a job like this is a great way to speed up developing. )

Midnight Fireworks in Melbourne -Stage 2-straight-wb

Stage 3: Autotone. – I never like how many tools AutoTone images.  To my eye, they always over expose the image and it always end up washed out.  But it is a great place to start.  If you treat Autotone as a starting point, then you are o.k… it never should be an end point.  Also I find, at least with my Nikon NEF (RAW), that the image always looks insipid, especially bright colours.  So expect to have more work after using this feature.

Midnight Fireworks in Melbourne -Stage 3-autotone

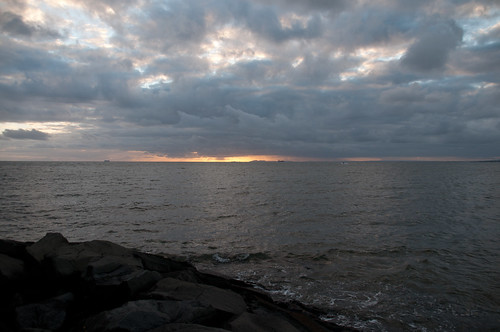
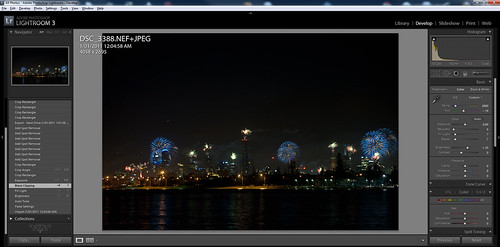
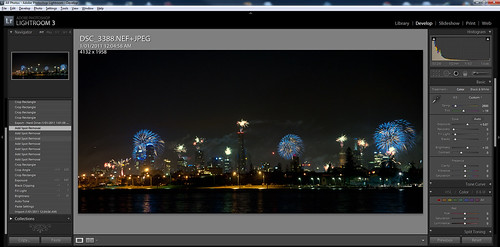
Stage 4: Brightness. – First thing to fix after the AutoTone, is brightness.  This was an image taken at midnight, I want the fireworks to standout, not the sky, or the water.  In this case, even a small reduction in brightness, brings the fireworks out of the sky.

Midnight Fireworks in Melbourne -Stage 4-brightness

Stage 5: Fill Light. AutoTone also introduces a fill light. Great for bringing objects out of a shadow.  But once again, that is not what I was after.  Drop the fill light right back for this style of image.

Midnight Fireworks in Melbourne -Stage 5-fill-light

Stage 6: Black Clipping. Pushing the black levels up, pulls the bright colours of the fireworks out of the background.  Also a small increase in black levels can hide a multitude of sins.  Be careful not to push it to far, as it can go from forgiving to punishing an image very quickly.

Midnight Fireworks in Melbourne -Stage 6-black-clipping

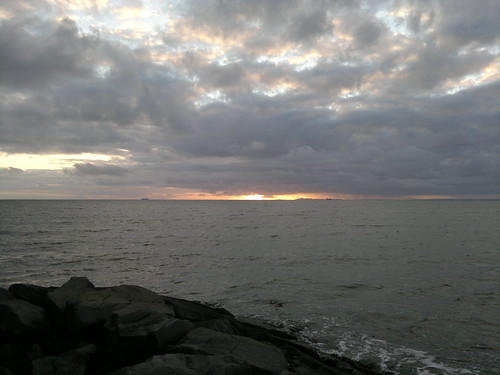
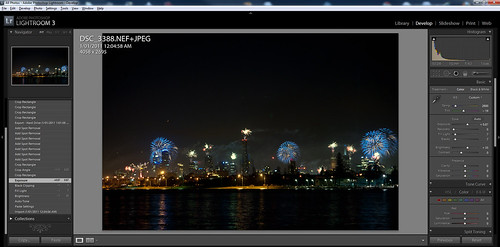
Stage 7: Exposure. Here I pushed the Exposure of the image up just a fraction.  Suddenly the colours that were a bit dulled with the Black Clipping and Fill Light, push back up, giving the image its vibrancy once more. ( Also don’t be afraid to play with the Vibrance and Saturation modes in the Presence panel, these can help lift an image. )

Midnight Fireworks in Melbourne -Stage 7-exposure

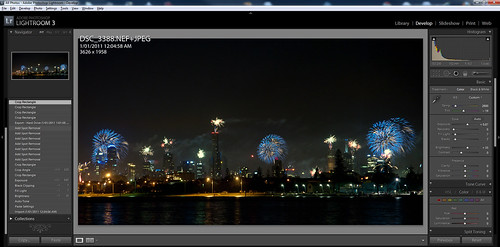
Stage 8: Crop – Possible the most important stage in this images development.  One that can take a broad image redress the balance issues and transform it to a striking image. In the first instance it was to balance the image to the rotation that had been put on the image in import. Then I major crop to pull out a lot of the empty space that was the sky.  Lightroom in crop modes gives you a nice rule of thirds crop tool.  So I balanced the image around a series of thirds for the fireworks and the sky above the skyscrapers.

Midnight Fireworks in Melbourne -Stage 8-crop

Stage 9: Angle Correction  – Don’t you hate, when you fix and angle and it still isn’t right.  Once the image was  initially cropped, I could see the leading lines clearer and the horizon looked a fraction out.

Midnight Fireworks in Melbourne -Stage 9-angle

Stage 10: Lens Flare Removal – 3 annoying green dots appeared on the image.  Small lens flares from the bright light of the fireworks.  Lucky for me, these could be quickly and easily removed as they were in a black area of sky, and not hanging over an important part of the image.  If they had been, it would have been a lot of work to clean these up.  And Photoshop would have been the tool I would have had to switch to.  The Spot Removal Tool can quickly pull pixels from a reference area and this only takes a few seconds to get rid of what really are just blemishes on the image.

Midnight Fireworks in Melbourne -Stage 10-lensflare-removal

Stage 11: Aircraft Removal – Once again using the Spot Removal tool, I removed the 3 little traces of light that were in the image that were the aircraft that were filming (I presume), the show.  At such a short exposure, the lines they made only served to act as distracting elements in the final shot.

Midnight Fireworks in Melbourne -Stage 11-aircraft-removal

Stage 12: Final Crop for Redbubble – Looking at this image the next day, I really wasn’t happy with the balance of the image.  It had to much space on the left hand side, and it was still way to top heavy. Before uploading the image for sale, I tweaked the crop to balance the image better, and give it its final aspect ratio as well.

Midnight Fireworks in Melbourne -Stage 12-final-redbubblecrop

Anyway I hope you can see from above, that 5 min in Lightroom can take a good image and help to transform it up at least a few levels.  Apart from managing my complete image libary, 90% of my images never leave Lightroom, I can do all the “digital developing” I need just in the one tool.

Remember if you buy a copy of this image… the money will help me buy more camera equipment… ( Next on the list the Sigma 50-500mm OS, which would have given me even betterer shots :-))

Ten of my fav shots of 2010

In no particular order….. with a few details on why I choose each of them.

Of course, I will walk away from this blog post, and go… oh shit, what about x or y…  but these are the stand outs for differing reasons.

But one thing these shots have in common is getting out there.  Sitting behind the computer may get you a few shots, but going out in the rain, the heat, the crowds, the isolation will get you the good photos.

10,000 Meters

10,000 Meters

Taken from an aircraft window, the colour for me tells the story.  This is one of my no subject matter shots, that says photography is still art.
Buy this at Redbubble

Freeeeedom

Freeeeedom

Taken at Brighton Beach, this shot for me is about fun, summer and expression. And a lot of luck to get all the elements and the camera in play at the same time.
Buy this at Redbubble

The end of 10

The end of 10

Oh so many sunsets to choose from….  This one has it all, the light, the colour, shapes and silhouettes.
Buy this at Redbubble

Voting in Australia

Voting in Australia #snagvotes

I was really pleased with this shot, one a quite a few, trying to capture what Voting in Australia really means.

Peace Love Brains

Peace Love Brains

For the life of me, I have no idea how I got the lighting on this shot so right. Taken at the Melbourne Zombie shuffle.

We Shall Remember them

We Shall Remember them

This is the first dawn service I have got up for in quite sometime.  One of the hard things, was trying to find a place to get a photo from, due to the crowds.
Buy this at Redbubble

Some people are just born Republicans

Some people are just born Republicans

Taken the day after I got my new 300mm lens, this is a still photo as a story.

The Way Home

The Way Home

Still one of my all time fav shots. This shot is a what the camera see’s, not what I saw.  And is the shot I was aiming for. I could see all the details in the dim light, I set the shot up to remove them and it worked.
Buy this at Redbubble

Closing up for the Day

Closing up for the Day

The depth of field and colouring in this shot all just sat together perfectly for me.
Buy this at Redbubble

@JohnBirmingham signing his new book After America

@JohnBirmingham signing his new book After America (Close up)

I was trying to get a photo of John, but one that told a story, not just a “fan” photo. This I felt was the essence of why he was where he was at the time.

Missing from the Exif: Sometimes the light is perfect

Magic hour, the hour around sunrise and sunset is called that for a reason.  The best light can be found when you have  a touch of luck and a lot of patience.  This shot was taken from what was a fairly average sunset.  But instead of putting the camera away and heading home, I stayed out for another 30 minutes, to grab the last touch of light.

In taking this shot, I wanted the whole sky, even with my 11-16mm Tokina, I still didn’t feel I had the whole sky.  Thus I went for the panorama.  When lining up the shot, the one thing I did notice, standing on the foreshore was the small waves lapping on the shore.  When trying to line up a panorama, waves are just a path to heart ache.  So I walked out till I was thigh deep in the water, passed the lapping waves.

This is a handheld panorama of about 10 shots, with a lot of overlap.  When shooting panorama’s always shoot in manual mode.  That way, when the shots merge, you will have consistent levels across each shot. Checking one shot that balances the light and dark will mean that your levels will be averaged out. The final image is 6335 x 4133 ( compared to 4288×2848 from the D90 )

Also this was one of my first sunset walks with the new GPS, but for some reason, my GPS decided I was 10 meters above sea level.

Camera Nikon D90
Exposure 0.004 sec (1/250)
Aperture f/6.3
Focal Length 16 mm
ISO Speed 250
Exposure Bias 0 EV
Flash No Flash
Date and Time (Modified) 2010:12:04 21:56:54
Exposure Program Manual
Date and Time (Original) 2010:12:04 20:44:05.00+11:00
Date and Time (Digitized) 2010:12:04 20:44:05
Max Aperture Value 2.8
Custom Rendered Normal
Exposure Mode Manual
White Balance Auto
Focal Length In35mm Format 24 mm
Image Number 87921
Lens 11.0-16.0 mm f/2.8
GPS Version ID 2.2.0.0
GPS Latitude 37 deg 54′ 57.54″ S
GPS Longitude 144 deg 59′ 8.35″ E
GPS Altitude Ref Above Sea Level
GPS Altitude 10 m
GPS Date Time 2010:12:04 09:44:02Z
GPS Satellites 10
GPS Img Direction Ref Magnetic North
GPS Img Direction 8.3

( Linked image is to lightboxed version as well, which looks much nicer )

Sometimes the light is perfect

And you can buy this as a print from RedBubble as well

Channel 9 Melbourne, stop stealing my stuff….

I’d love to work in main stream media, there are so many perks. The biggest these days seems to be that you can appropriate content from anyone with a glib line and not give them any recognition what-so-ever.

Melbourne had a very impressive line of thunderstorms move through on Friday (12 Nov. 2010) evening, so as a weather “nut”, I’ve got the radar on the computer, and the camera ready to go. When a squall hit at home, I switched from stills to a quick 1 minute video.

Perchance on Saturday night, (TV in the kitchen while cooking tea) I happen to catch the Melbourne 9 news story about the weather. And whilst still being grumpy about calling something a mini tornado, which there is no such thing as, I see a glimpse of a bit of footage, and think, hey that looks familiar…

Today, I checked the NineMSN website for the story, with that nagging feeling still present… and guess what… it WAS my footage. 2 seconds or 10 seconds doesn’t matter to me. It was my footage, I did not give permission, was not asked for consent, was given no recognition, and certainly I was not TOLD.

http://news.ninemsn.com.au/video.aspx?videoid=1cdb6005-75d8-4622-9ba0-c81aae430307 ( scroll to 1:22 )  ( Can someone identify the second piece of footage? )

If I had been asked, the chances are I would have said yes, but that really is beside the point. If someone from Channel 9 is surfing YouTube for content, how hard would it be to leave a comment saying, “great footage, can we use it”, or even, “great footage, we used a few seconds of it on the news”. It is about recognition, not theft!

Guessing what 3 seconds of footage on primetime news costs, I think if channel 9 buy me a new Nikon D7000, I’ll take that as payment for services rendered.

Really, come on media, lift your game.

My footage ( watch on youtube for the 720 version, video recorded on my Nikon D90)

and one of my still shots…

Cloudy with the chance of Apocalypse

Update:

——–

COPYRIGHT ACT 1968 – SECT 42

Fair dealing for purpose of reporting news

(1)  A fair dealing with a literary, dramatic, musical or artistic work, or with an adaptation of a literary, dramatic or musical work, does not constitute an infringement of the copyright in the work if:

(a)  it is for the purpose of, or is associated with, the reporting of news in a newspaper, magazine or similar periodical and a sufficient acknowledgement of the work is made; or

(b)  it is for the purpose of, or is associated with, the reporting of news by means of a communication or in a cinematograph film.

——–

I’m guessing option b is what their defence would be, but still, my point of being TOLD, is not covered.  Someone from Channel 9 was on Youtube, took MY copyrighted content, for “news” value and couldn’t even be arsed to leave a comment saying that they had?

I guess it falls into the you wouldn’t steal a car, you wouldn’t steal a handbag, don’t steal a movie, unless it has news value, and you don’t want to even notify the owner of the video you have “stolen” it.

Unless as per Section 6 par C of the Youtube TOS http://www.youtube.com/t/terms Channel 9 have a licensing deal with Youtube for content.   Personally I’d like to know if Channel 9 do have a deal with YouTube, and certainly if they haven’t does the Copyright Act trump the TOS of Youtube and Google? ( I’ll leave the lawyers for the respective parties to argue that one )

Perhaps it is time the Copyright Act was dramatically updated to include fair use of social media.  A clause of attribution and notification on the source of the content seems reasonable to me.

Quick Camera Show Down on the Nokia N8

First quick post to do with my new Nokia N8, one of the big selling points is the camera…  so lets deal with that first.

The Show Down Consisted of the following…
( plus the Nikon D90 DSLR, which took this shot)
Too many cameras is never enough

Overcast Sunset – Brighton, Melbourne, Saturday 23/10/10

All devices were set on automatic mode and a couple of shots were taken, the best of which I uploaded to flickr.

Each image links through to the flickr version, where you can see the full image as well.

——————————————————————————-

Nokia X6 – 5MP
Comparing the N8 - Nokia X6 - 5MP

Exposure 0.01 sec (1/100)
Aperture f/2.8
Focal Length 5.2 mm
ISO Speed 100
X-Resolution 300 dpi
Y-Resolution 300 dpi

——————————————————————————-

JVC FM1 – 8MP
Comparing the N8 -  JVC FM1 - 8MP

Exposure 0.006 sec (1/163)
Aperture f/2.8
Focal Length 3.9 mm
ISO Speed 100
X-Resolution 72 dpi
Y-Resolution 72 dpi

——————————————————————————-

HTC Desire – 5MP
Comparing the N8 - HTC Desire - 5MP

This is the only Exif Data for the shot from the Desire

ISO Speed 100
X-Resolution 72 dpi
Y-Resolution 72 dpi

——————————————————————————-

Nikon D90 – 12MP
Comparing the N8 - Nikon D90 - 12MP

Exposure 0.006 sec (1/160)
Aperture f/6.3
Focal Length 18 mm
ISO Speed 200
X-Resolution 240 dpi
Y-Resolution 240 dpi

——————————————————————————-

Nokia N8 – 12MP
Comparing the N8 - Nokia N8 - 12MP

X-Resolution 300 dpi
Y-Resolution 300 dpi
Exposure 0.005 sec (1/218)
Aperture f/2.8
Focal Length 5.9 mm
ISO Speed 105

I think the D90 wins… but then it should. But the N8 for a mobile phone, which of course happened to be the only device that could upload the photos from all the other devices, comes a very very respectable second.

RAW versus JPG: Digital Camera File Format Faceoff

This is a cross post of a joint blog post from Neerav’s article…

RAW and JPG are different ways of creating photos in a digital camera. Each has advantages and disadvantages. In the Blue corner we have Wolfcat who argues in favour of the RAW file format and in the Red corner we have Neerav who argues in favour of the JPG file format.

Neerav Bhatt Photos Shown at Lumixlife Gallery Exhibition

Pro-JPG Argument

For some background so you understand where I’m coming from: I love to take photos, mostly of urban streets, wilderness and wildlife.

I take 99.9% of my photos in JPG format and have used these successfully to create A4 posters, a photo book, sold photos for use in technology websites and magazines to accompany my articles, and had some displayed in an art gallery on 32-50inch TV screens.

I understand that RAW has some technical benefits but for the vast majority of photographers out there JPG will be the best option because:

  • for 99% of people JPG image quality is already far more than they need
  • it’s convenient because images don’t require any post-processing
  • the vast majority of keen amateur photographers don’t have the time or inclination to sit at a computer for hours after a day spent taking photos, post-processing RAW camera files into JPG photos manually one by one.
  • RAW files cannot be immediately shared to the Internet because they require processing with a computer that is reasonably fast. When I take photographs at events I can share the best JPGs to Flickr within minutes using my cheap, underpowered netbook computer,
  • the more affordable digital cameras used by keen amateur photographers are noticeably slower at taking RAW format photos than JPG’s. I guarantee “RAW only” hardliners have missed out on photo opportunities because their camera takes time recording each massive RAW file,
  • JPG file sizes are far smaller and therefore take up less space on your camera card, in your photo archive, and when transferring them internally on your home network or on the internet.
  • Arguments that storage space is getting cheaper are irrelevant. Try calculating how many camera cards you’d need to store 100 photos/day, every day for a month on holiday and you’ll see what I mean,
  • JPG files can be viewed on any desktop or laptop computer as well as many electronic devices including smartphones, TV’s, dvd/bluray players etc,
  • RAW encourages lazy “i can always do it properly on the computer” photography. I own Photoshop CS5 and find it useful, but much prefer to get the camera settings right first time in the camera and not have to spend time fiddling later

There are over a hundred different variations of RAW file formats needing special software to convert them to JPG. Often new cameras record in a RAW format that can’t be opened by older image processing applications like Adobe Photoshop.

If you must use RAW then DNG is the best RAW format for archival purposes. The US Library of Congress classified proprietary RAW files as “Less desirable file formats” suggesting that DNG be used instead.

The only times I would ever consider using a RAW format such as DNG are:

  1. if I was being paid to do a commercial photography job. Even then I’d use DNG+JPG which takes each photo in both formats so I could use the JPG’s immediately and the DNG’s only if required.
  2. If I was on holiday and paying lots of money for a unique one off experience eg: hot air balloon ride then I’d set my camera to DNG+JPG.

I leave the final word to respected amateur photographer and camera reviewer Ken Rockwell:

If you shoot hundreds or thousands of images in a day shoot JPG and don’t worry. The quality is the same for almost all intents and purposes as raw, and the raw files would take gigabytes or tens of gigabytes and resultant hours to download, convert, catalog and burn to backup CDs. In fact, if you shoot this much then JPG can give better quality since attempting to shoot this much raw will constipate your workflow and you could miss making some images entirely as your cards fill up. You’d always be running out of memory cards or time waiting for the access light to stop blinking.

If you love to tweak your images one-by one and shoot less than about a hundred shots at a time than raw could be for you. In fact, if you prefer the look you can get from raw (it may be different from JPG in some cases depending on software) you can let your computer batch process images and save the results as JPGs, too. I almost never shoot anything in raw, and when I do I never see any difference for all the effort I wasted anyway. (I can see differences if I blow things up to 100% or bigger on my computer, but not in prints.)

JPG vs RAW – Get it right the first time (Ken Rockwell)

Further reading

The RAW Flaw – Luminous Landscape

Are Raw Files Forever? – Luminous Landscape

DNG – Sustainability of Digital Formats – Planning for Library of Congress Collections

Still Image Preferences – Sustainability of Digital Formats – Planning for Library of Congress Collections

Raw as Archival Still Image Format: A Consideration (University of Connecticut Libraries)

Adobe TV – Advantages of DNG format

Pro-RAW Argument

First confession I shoot RAW and JPG. However 99% of the time I just ignore the JPG files, cause I never use them, never see them and they just end up taking up space on my harddrive.

I’m a keen landscape shooter. I like to document the world around me looking for that unique angle on this great country we live in. Whilst I shoot in colour.. I’m a huge fan on the black and white as well for real story telling.

  1. There is only one kind of RAW. The kind your camera shoots. I shoot with a Nikon D90, so I get .NEF files. I really don’t care about other RAW formats. Why, because that is like saying I drive a Diesel powered car, but there are too many kinds of Petrol to confuse me.
  2. Quality doesn’t matter. No of course it doesn’t, unless you care about the photo. Unless that photo is a touch under/over exposed, the white balance is out, the horizon line is a few degrees of centre, the lens you used has a certain type of distortion that throws out straight lines or the highlights are a bit over exposed. Any of these mean you are going to want to “fix” the photo.
  3. Sure Ken Rockwell can shoot in full manual mode and get White Balance and everything perfect every time, never needing to touch Photoshop at all to fix any image…. But are you Ken Rockwell.
  4. You’re are sure that you know what the correct colour temp for each setting is, because you shoot in a perfectly stable environment, with colour charts and controlled lighting every time. Nope didn’t think so. Guess what you are going to want to correct that photo.
  5. Batch Processing is your friend. I use Lightroom3 to processes all my RAW images. If they are similar I can spend time on one image get the settings right and apply them to hundreds of photos in a few minutes.
  6. Raw is non destructive, you aren’t dealing with a lossy compression like JPG you have all the information to play with. You don’t have to trust the camera to guess what you wanted, you have complete control. JPG is also 8bit colorur. The RAW files I shoot are 12bit colour.
  7. Cost of storage is cheap. I have an offsite backup of my photos on a 1.5TB drive that I purchased for $98 dollars. I run a few 4gb cards and can shoot around 240 images per card. And I always take a harddrive with me on trips to backup the images anyway, that drive is a USB powered HD that is 880gb which cost me $120.
  8. JPG is easier. Yes it is, but then so is buying a pizza from the supermarket compared to making one at home. The one you make at home will have all the toppings you want and be to your taste, not the cheapest food to make the pizza.
  9. And finally how often do you need to “get” the shot up straight away. If you are really doing that, you are shooting from a mobile phone anyway. Most of the time you are going to have access to something to process the image regardless. ( I know I do )
  10. If you only store the JPG’s in 6 months time or a years time when someone spots that great image and wants the full size image for print… what did you do with it, oh yes that is right, you compressed it put lots of effects in photoshop and compressed it again.

While I do agree that JPG is easier to use, just because it is easier doesn’t make it better. I like to ensure that the colours on my image are visually correct and that the tones reflect the mood of the image. Say I want a black and white image, shooting RAW gives me complete tonal control much more than JPG ever can. And all for very little work!

And I’ll leave the final word to these images….

The JPG VS the RAW.

JPG

RAW VS JPG ( JPG Version )

This RAW took me a minute to tweak in Lightroom 3.

RAW VS JPG ( RAW Version )

Further Reading

Why Shoot RAW – Photography Review

When to Shoot RAW – Macworld

Understanding Raw Files – Luminous Landscape

Photo Lightroom -Adobe

Open Source Raw Processing Win, Linux

How To Shoot RAW without Fear, Uncertainty and Doubt by Michael Tapes

Nikon D7000 vs Nikon D90….

Here is the Show Down Table, comparing the D7000, to the D90.

These are the major features where the D7000 trumps the D90.

[image title=”Nikon D7000″ size=”full” id=”1394″ align=”right” ] [image title=”Nikon D90″ size=”full” id=”1393″ align=”right” ]
Nikon D7000 Nikon D90
Construction Magnesium alloy body Polycarbonate
Sensor • 23.1 x 15.4 mm CMOS sensor
• 16.2 million effective pixels
• 14-bit A/D converter
• 23.1 x 15.4 mm CMOS sensor
• 12.3 million effective pixels
• 12-bit A/D converter
ISO range • ISO 100-6400
• H1 and H2 (ISO 12800 and 25600) expansion
• ISO 200 -3200
• L1 (ISO 100) and H1 (ISO 6400) expansion
Movie resolution* • 1920 x 1080p (24fps) • 1280 x 720p (24 fps)
AF sensor • 39 AF points
• 9 cross-type sensors
• 11 AF points
• 1 cross-type sensor
Metering sensor • TTL exposure metering using 2016-pixel RGB sensor • TTL exposure metering using 403-pixel RGB sensor
Viewfinder • 100% frame coverage
• Dioptric adjustment: -3.0 to +1.0 diopter
• 96% (horizontal and vertical) frame coverage
• Built-in diopter adjustment (-2 to +1m-1)
Continuous shooting rate • Approx. 6 fps max • Approx. 4.5 fps max
Max Shutter Speed • 1/8000 second • 1/4000 sec
Modes • Portrait, Landscape, Child, Sports, Close up, Night portrait, Night landscape, Party/indoor, Beach/snow, Sunset, Dusk/dawn, Pet portrait, Candlelight, Blossom, Autumn colors, Food, Silhouette, High key, Low key, U1 (user settings 1), U2 (user settings 2) • Portrait, Landscape, Close-up, Sports, Night portrait
Pixel Density • 4.6 MP/cm² • 3.3 MP/cm²
Video Format • MOV, H.264 (Stereo with external mike), 20 Min Max length • AVI M-JPEG ( Mono), 5 Min Max length
Memory format • SD/SDHC/SDXC (dual slots) • SD/SDHC
Dimensions 132 x 105 x 77mm
(5.2 x 4.1 x 3.0in)
148 x 111 x 74 mm
(5.8 x 4.3 x 2.8in)
Weight (inc battery) 780 g (1.7 lb.) 704 g (1.5 lb.)
header

(Source of Table:  DP Review and Nikon- if I have missed out something let me know.)

As you can see this camera leaves the D90 in the dust.  Low light and fast photography have all been ramped up incredibly.  And for a RRP or around the $1200 USD mark it gives the non professional shooter a great camera with many Pro and Semi Pro features at what I think is a great price.

A few other thoughts….

The extra mega pixels can ensure larger printers ( although the prints I have got from my D90 at A3 are stunning), but it also gives you a bit more crop room.  You can cut that little bit more of the edges of your image that don’t quite line up and still get the same print size.  Further (somewhat reduced by the D7000 having a virtual horizon) is that you can rotate your images to straighten them as well and still get a full size print.

The extra 4% in the view finder may not seem much, yet having a 100% Viewfinder means that nothing unexpected will creep into the side of your image. I’ve got used to always checking on my D90 that I’ve got the whole shot and nothing extra, but having the 100% Viewfinder is something that just makes your life in post processing much easier.

I’d love to get my hand on the camera just for the Shutter Speed as well.  1/8000th of a second will freeze just about anything.  Perfect for insects in flight, water in motion e.t.c. The extra 2 FPS on the body is also fantastic as well, letting you burn through action.

The other great feature is the “weather-resistant” body.  There have been times I’ve had to stop shooting with just a few drops of rain on the D90, the D7000 lets you get a bit more extreme with your shooting, without having to worry about dust and a few drops of rain.

The Video feature has been dramatically expanded as well.  One thing is I am glad that Nikon have moved to H264 .mov files.  This has become the standard for video these days and opens up a lot more options for cleaning editing as well over the motion jpeg format. ( But this is something for others to comment on.  I’ve never really used the video feature on my D90, and I’d suspect that the same would be true for the D7000.

Overall, whilst the D90 maybe around for awhile yet, I’d have to say just on the specs and the initial reviews your better of getting the D7000.

Note sure on Australian released date… but US date is October… so should be sometime next month.

P.S

Please now buy some of my art work…. So I can afford it….

Some More from around the Web:

Nikon Rumors
Nikon D7000: Camera Road Test With Chase Jarvis
D7000 dpreview hands-on
Offical Nikon D7000 Site

And hands on video care of Engadget.

and a Nikon promo video….

Kim Stanley Robinson at #aus4

Thanks to my sister in law I got to go to Aussie Con 4.

I caught most of the talks Kim Stanley Robinson did…. here is just one of them. Talking about Climate Change, Science and the politics of denial.

(from the Aussie Con Programme )

“Climate change and utopia. – In the last thirty years utopia has gone from a nice idea to a survival strategy. In the coming era of climate change we will not be able to muddle through in our current system, because the bio-physical base of our existence will not support it. Social change is therefore inevitable; and the work of all the sciences together now suggest an emerging plan for change in a positive direction, and a resulting sustainable civilization. Enacting that plan will be both the history of the twenty-first century and the best utopia yet. The talk will explicate this argument. “

(Sorry in advance for the couple of times my phone hunted for signal)

For my photos from Aussie Con 4 visit the flickr set here