Entries Tagged as 'Redbubble'

Latrobe Valley Drive Video

So I didn’t get to do a big road trip this Xmas… so to get the cobwebs out the the car and my brain, I did I quick one day 500km round trip to get some photos I had always wanted.

This video is the Moe and surrounds part of the trip. The to and from Moe was just freeway driving, so here is the more interesting 220km (roughly) of the trip. Video was recorded on a Microsoft HD Lifecam at 720p at 7.5fps, then compressed down to a single 5min movie.
Enjoy.

(Choose full screen to watch in HD, or watch on youtube for lower res version )

The Approx Route of the video ( this doesn’t include a couple of dirt tracks that I drove up, like the road to Mt Erica Car Park )

View Larger Map

And what I was after were shots like this of the Power Stations in the Latrobe Valley.

Keep your Cool ( B&W Version )

And the trip was timed for sunset… ( which luckily for me had some nice golden colours )
Across the Ponds

( These Shots are also on Redbubble as well )

Currently in Beta – the baby clothes…

A friend sent me this photo of her niece wearing a piece of @wolfcat clothing…

it was too good not to share 🙂

[image title=”inbeta-photo-small” size=”full” id=”1620″ align=”center” linkto=”http://www.redbubble.com/products/configure/6247542-kids-clothes” ]

 
Click on the image for the RedBubble link… ( also available in t-shirts and hoodies )

Missing from the EXIF: Lightroom Tweaks to Midnight Fireworks

This post shows how I created this image via all the processing in Adobe Lightroom 3.4 ( The previous blog entry Missing from the EXIF: Midnight Fireworks covers the details of the actual shoot itself )

Most of the processing was done when I got home from the fireworks show, with only additional cropping the next day before it became the Redbubble version of the image.

Each of these images opens into a new tab/window, in Flickr Lightroom mode so you can see all the details.  These are untouched screenshots, so that you can see the whole process I went through.

This covers from 12:54:56am when I opened imported the image to Lightroom, to 1:01:58 when I exported the image for uploading to Flickr.

Stage 1: The Raw Image.  Shoot RAW, if you shoot JPG once you start pushing an image you will run into its limitations.  RAW as the digital negative is way more forgiving.  Further as Lightroom is non-destructive on your RAW files, you can tweak till your heart is content, and still go back to the original if ( in my case when ) you go to far.

Midnight Fireworks in Melbourne -Stage -import

Stage 2: Rotate and White balance. – As all the images from the start of the show to the finish were in the same light, and the camera was fixed to a tripod, I tweaked one image quickly for rotation and balance.  Then in Lightroom, copied only those develop settings, then pasted them to all the images. ( Batch processing even small parts of a job like this is a great way to speed up developing. )

Midnight Fireworks in Melbourne -Stage 2-straight-wb

Stage 3: Autotone. – I never like how many tools AutoTone images.  To my eye, they always over expose the image and it always end up washed out.  But it is a great place to start.  If you treat Autotone as a starting point, then you are o.k… it never should be an end point.  Also I find, at least with my Nikon NEF (RAW), that the image always looks insipid, especially bright colours.  So expect to have more work after using this feature.

Midnight Fireworks in Melbourne -Stage 3-autotone

Stage 4: Brightness. – First thing to fix after the AutoTone, is brightness.  This was an image taken at midnight, I want the fireworks to standout, not the sky, or the water.  In this case, even a small reduction in brightness, brings the fireworks out of the sky.

Midnight Fireworks in Melbourne -Stage 4-brightness

Stage 5: Fill Light. AutoTone also introduces a fill light. Great for bringing objects out of a shadow.  But once again, that is not what I was after.  Drop the fill light right back for this style of image.

Midnight Fireworks in Melbourne -Stage 5-fill-light

Stage 6: Black Clipping. Pushing the black levels up, pulls the bright colours of the fireworks out of the background.  Also a small increase in black levels can hide a multitude of sins.  Be careful not to push it to far, as it can go from forgiving to punishing an image very quickly.

Midnight Fireworks in Melbourne -Stage 6-black-clipping

Stage 7: Exposure. Here I pushed the Exposure of the image up just a fraction.  Suddenly the colours that were a bit dulled with the Black Clipping and Fill Light, push back up, giving the image its vibrancy once more. ( Also don’t be afraid to play with the Vibrance and Saturation modes in the Presence panel, these can help lift an image. )

Midnight Fireworks in Melbourne -Stage 7-exposure

Stage 8: Crop – Possible the most important stage in this images development.  One that can take a broad image redress the balance issues and transform it to a striking image. In the first instance it was to balance the image to the rotation that had been put on the image in import. Then I major crop to pull out a lot of the empty space that was the sky.  Lightroom in crop modes gives you a nice rule of thirds crop tool.  So I balanced the image around a series of thirds for the fireworks and the sky above the skyscrapers.

Midnight Fireworks in Melbourne -Stage 8-crop

Stage 9: Angle Correction  – Don’t you hate, when you fix and angle and it still isn’t right.  Once the image was  initially cropped, I could see the leading lines clearer and the horizon looked a fraction out.

Midnight Fireworks in Melbourne -Stage 9-angle

Stage 10: Lens Flare Removal – 3 annoying green dots appeared on the image.  Small lens flares from the bright light of the fireworks.  Lucky for me, these could be quickly and easily removed as they were in a black area of sky, and not hanging over an important part of the image.  If they had been, it would have been a lot of work to clean these up.  And Photoshop would have been the tool I would have had to switch to.  The Spot Removal Tool can quickly pull pixels from a reference area and this only takes a few seconds to get rid of what really are just blemishes on the image.

Midnight Fireworks in Melbourne -Stage 10-lensflare-removal

Stage 11: Aircraft Removal – Once again using the Spot Removal tool, I removed the 3 little traces of light that were in the image that were the aircraft that were filming (I presume), the show.  At such a short exposure, the lines they made only served to act as distracting elements in the final shot.

Midnight Fireworks in Melbourne -Stage 11-aircraft-removal

Stage 12: Final Crop for Redbubble – Looking at this image the next day, I really wasn’t happy with the balance of the image.  It had to much space on the left hand side, and it was still way to top heavy. Before uploading the image for sale, I tweaked the crop to balance the image better, and give it its final aspect ratio as well.

Midnight Fireworks in Melbourne -Stage 12-final-redbubblecrop

Anyway I hope you can see from above, that 5 min in Lightroom can take a good image and help to transform it up at least a few levels.  Apart from managing my complete image libary, 90% of my images never leave Lightroom, I can do all the “digital developing” I need just in the one tool.

Remember if you buy a copy of this image… the money will help me buy more camera equipment… ( Next on the list the Sigma 50-500mm OS, which would have given me even betterer shots :-))

Missing from the EXIF: Midnight Fireworks

New Years Eve… if you are lucky with the weather and the crowds can result in some great fireworks shots. This is the process I went through to ensure I got the shots I wanted.

First thing to do is plan. Where are you going to be, what shots do you want, and how much time are you willing to spend to get them. Getting in nice and close to the action is all well and good, but does require a big investment in time and patience. In Sydney, that can mean setting up at 8am for a midnight shoot, fighting the crowds all day to keep that clear line of sight. A clear line of sight, that come the 10 second count down can disappear in a flash as people stand up around you. In Melbourne, it isn’t quite that bad, but facing crowds for 6+ hours to get a shot, was not how I wanted to spend my New Years Eve.

So I took an easy way out… I went for the long shot. The whole of city across some water was what I was aiming for. Luckily for me, my fav place to shoot sunsets provided just the view I knew I wanted. So I had the shots pre-planned in my head some days before hand and didn’t have to fight crowds and traffic to get them.

Next on the list is practice. The midnight fireworks show might run for 10minutes. That is not the time to be changing your lens, testing focal settings, and different exposures and apertures. That 10min is all about getting the photos. In Australia (not sure about other places around the world), there are two shows. The family friendly version, much shorter, and just after dusk, and the main event. So I headed to the beach 1 hour before the first show to do a practice run. The one hour also meant I still could get a few shots of the sunset, and work out the best place to be before the fireworks started.

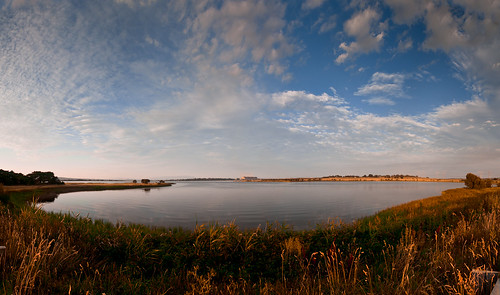
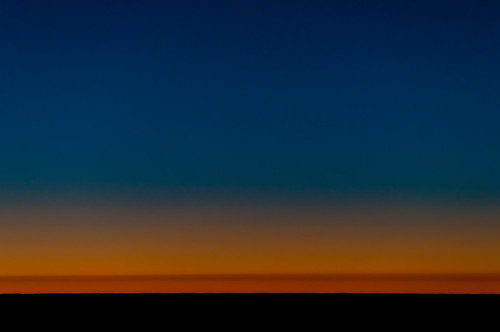
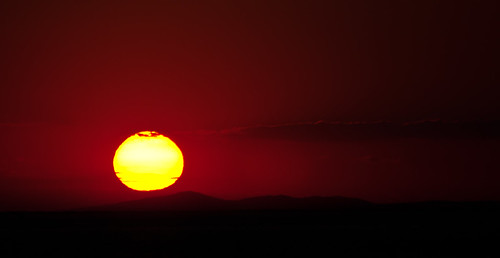
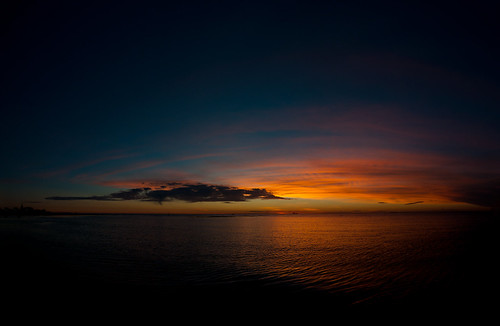
Whilst waiting, it is a good time to get some shots in as well. We had a stunning sunset on the 31 of December 2010….

Final Sunset of 2010 #nyemelb

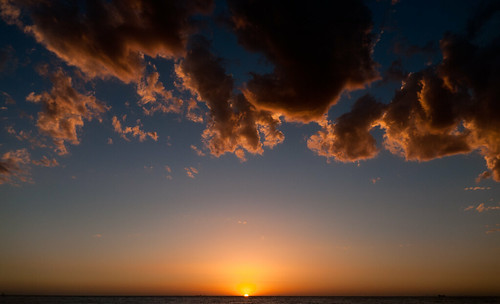
So a few shots of that… help to tell a story, that of the whole evening….

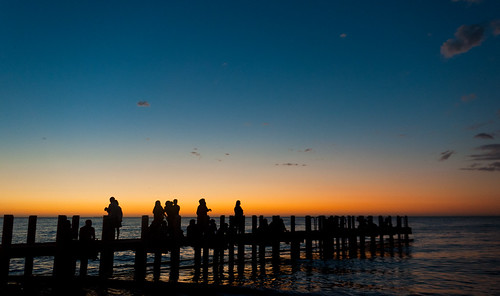
I originally had my self set up on the Jetty at North Road, with only a few people sitting on it, it seemed to give me the shots I wanted over the water to the city skyline.  But then as more and more people walked on the Jetty, I noticed a small problem.  Camera shake.  Every single person that walked on the metal jetty gave the camera lens a small vibration.  Now shooting at 100mm plus and aiming for 3second exposures was just not going to work.  But I still had plenty of time to move to a new location just off the Jetty itself.

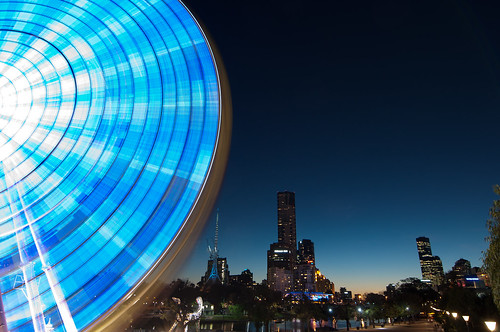
This then gave me another great shot.. The crowd on the Jetty, on dusk waiting for the show to being.

Waiting for the show #nyemelb

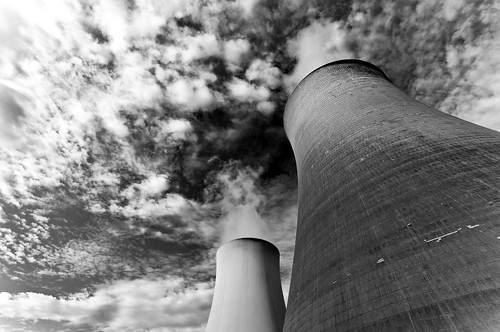
I had a rough idea of the camera settings I was going to be using… but as always the actual light at the time always change things.  The other big factor is wind.  A small breeze on the camera unless you have a very heavy tripod and a sandbag will give you camera shake.  Camera shake = ruined photo.  And this was a problem for me coupled with the choice of lens I made for the first of the evenings displays.  I only managed a few good shots.  Shots that were in focus, had a nice display of fireworks and didn’t have camera shake.
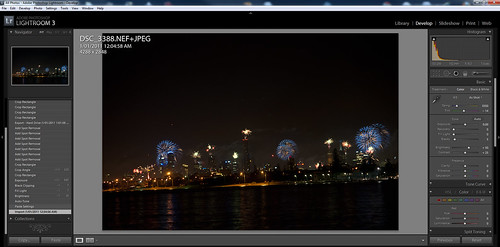
Let the Show Begin #nyemelb

EXIF on this shot…

Camera Nikon D90
Exposure 1.6seconds
Aperture f/8.0
Focal Length 200 mm
ISO Speed 200
Lens: Sigma 18-200mm f/3.5-6.3
Exposure Program Manual

I did attempt a few shots with my longer 70-300mm lens, but this lens (like the Sigma) doesn’t have Vibration Reduction (also known as IS or OS or VR ). With the slight breeze and the longer focal range, all of these shots bar a couple just didn’t work out.  So I knew that when I went back for the main event, I would take my trusty 55-200mm Nikkor VR kit lens.  Under 200mm was still going to give me the shot I wanted anyway. And every little bit helps as they say.

So after getting these shots it was a quick 10min drive home to download the shots onto the computer and see what I had via lightroom.  As much as I love the big screen on the Nikon D90, nothing beats looking at the shots on a 24″ 1920×1080 monitor to check for focus and clarity.  This one of the big advantages of going for the long shot, over the close up shot.

Now, I was ready, I could empty the card for the evening, make sure my battery was fully charged, that the remote was working correctly and the most important thing, that I was sober.  Taking good photos on New Years Eve does mean you will miss out on a few drinks.  A clear head is certainly required.

Back to the beach I went, 3/4 of an hour before the main event.  But unlike last time, there was no stuffing around trying to work out where to stand and what the shots would or would not look like.  Tripod was set up front row on the breakwater, so no one could stand in front of me, and I was ready for the main event.

And away I went.  I did some test shots over the city just before midnight, to make sure that the Exposure and Aperture were correct.  10 second count down…  and the show is on.

It is a great thing to watch, and that is what I did.  Using the wireless remote I didn’t have to touch the camera, just change focal lens a few times to get some different shots. Fire off some shots, quick look at the viewfinder, whilst still watching the show, fire off some more.. repeat.  10minutes is not long….

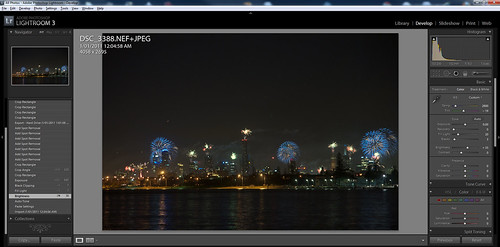
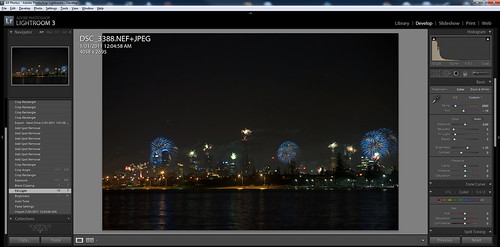
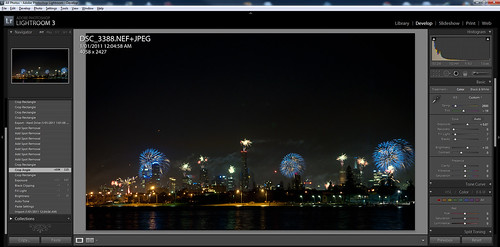
Get home, quick process to put up a shot just showing the event, then leave it for the evening…

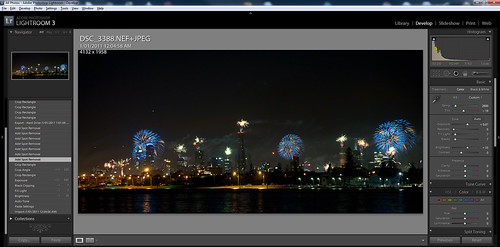
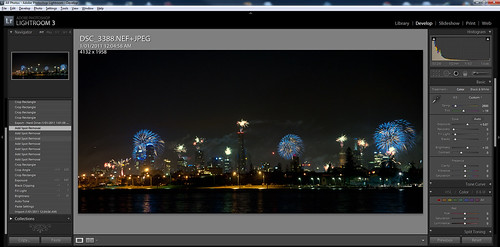
Next day, spend some time in lightroom, delete the junk shots no point in keeping them… Then check all your keepers for white balance, crop, angle, sharpness, colour, e.t.c.  I ended up with 4 keepers that I have put up on Redbubble from that evening.

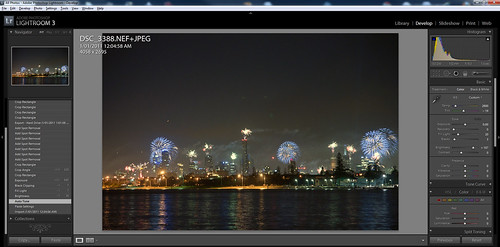
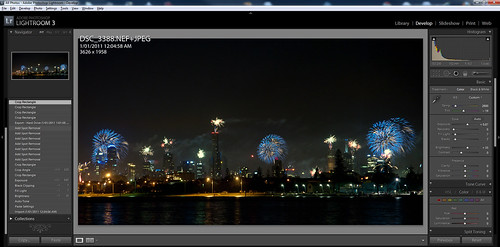
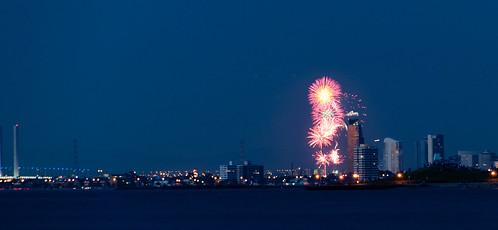
But this is the shot that most people seemed to love.

Midnight Fireworks in Melbourne #nyemelb

The EXIF Info:

Camera Nikon D90
Exposure 1.6seconds
Aperture f/4.5
Focal Length 102 mm
ISO Speed 200
Exposure Bias 0 EV
Flash No Flash
Date and Time (Modified) 2011:01:01 01:02:01
Exposure Program Manual
Date and Time (Digitized) 2011:01:01 00:04:58
Exposure Mode Manual
White Balance Auto
Focal Length In35mm Format 153 mm
Creator Tool Adobe Photoshop Lightroom 3.3
Lens Nikkor 55.0-200.0 mm f/4.0-5.6 VR

So as you can see from this overly long blog post…. a bit of thought and effort does go into these shots.

I hope you enjoy them as much as I did in taking them.

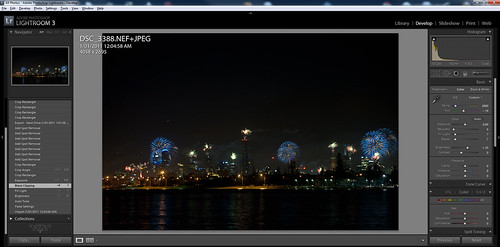
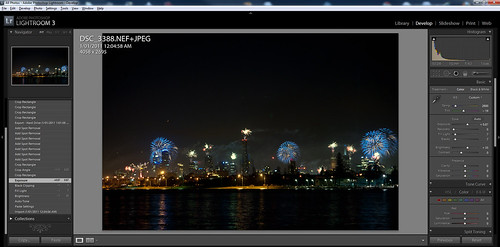
The versions on Redbubble, are all with different coloured fireworks and a different colour dominating the shot.  This is so that you can choose a framed print that has a colour that suits the space you are putting it in. ( and please do buy them 🙂 from  Redbubble ( it does help me buy more camera equipment ) )

( And the complete Flickr Set is here of all the fireworks shots plus the ones above. )

Ten of my fav shots of 2010

In no particular order….. with a few details on why I choose each of them.

Of course, I will walk away from this blog post, and go… oh shit, what about x or y…  but these are the stand outs for differing reasons.

But one thing these shots have in common is getting out there.  Sitting behind the computer may get you a few shots, but going out in the rain, the heat, the crowds, the isolation will get you the good photos.

10,000 Meters

10,000 Meters

Taken from an aircraft window, the colour for me tells the story.  This is one of my no subject matter shots, that says photography is still art.
Buy this at Redbubble

Freeeeedom

Freeeeedom

Taken at Brighton Beach, this shot for me is about fun, summer and expression. And a lot of luck to get all the elements and the camera in play at the same time.
Buy this at Redbubble

The end of 10

The end of 10

Oh so many sunsets to choose from….  This one has it all, the light, the colour, shapes and silhouettes.
Buy this at Redbubble

Voting in Australia

Voting in Australia #snagvotes

I was really pleased with this shot, one a quite a few, trying to capture what Voting in Australia really means.

Peace Love Brains

Peace Love Brains

For the life of me, I have no idea how I got the lighting on this shot so right. Taken at the Melbourne Zombie shuffle.

We Shall Remember them

We Shall Remember them

This is the first dawn service I have got up for in quite sometime.  One of the hard things, was trying to find a place to get a photo from, due to the crowds.
Buy this at Redbubble

Some people are just born Republicans

Some people are just born Republicans

Taken the day after I got my new 300mm lens, this is a still photo as a story.

The Way Home

The Way Home

Still one of my all time fav shots. This shot is a what the camera see’s, not what I saw.  And is the shot I was aiming for. I could see all the details in the dim light, I set the shot up to remove them and it worked.
Buy this at Redbubble

Closing up for the Day

Closing up for the Day

The depth of field and colouring in this shot all just sat together perfectly for me.
Buy this at Redbubble

@JohnBirmingham signing his new book After America

@JohnBirmingham signing his new book After America (Close up)

I was trying to get a photo of John, but one that told a story, not just a “fan” photo. This I felt was the essence of why he was where he was at the time.

Missing from the Exif: Sometimes the light is perfect

Magic hour, the hour around sunrise and sunset is called that for a reason.  The best light can be found when you have  a touch of luck and a lot of patience.  This shot was taken from what was a fairly average sunset.  But instead of putting the camera away and heading home, I stayed out for another 30 minutes, to grab the last touch of light.

In taking this shot, I wanted the whole sky, even with my 11-16mm Tokina, I still didn’t feel I had the whole sky.  Thus I went for the panorama.  When lining up the shot, the one thing I did notice, standing on the foreshore was the small waves lapping on the shore.  When trying to line up a panorama, waves are just a path to heart ache.  So I walked out till I was thigh deep in the water, passed the lapping waves.

This is a handheld panorama of about 10 shots, with a lot of overlap.  When shooting panorama’s always shoot in manual mode.  That way, when the shots merge, you will have consistent levels across each shot. Checking one shot that balances the light and dark will mean that your levels will be averaged out. The final image is 6335 x 4133 ( compared to 4288×2848 from the D90 )

Also this was one of my first sunset walks with the new GPS, but for some reason, my GPS decided I was 10 meters above sea level.

Camera Nikon D90
Exposure 0.004 sec (1/250)
Aperture f/6.3
Focal Length 16 mm
ISO Speed 250
Exposure Bias 0 EV
Flash No Flash
Date and Time (Modified) 2010:12:04 21:56:54
Exposure Program Manual
Date and Time (Original) 2010:12:04 20:44:05.00+11:00
Date and Time (Digitized) 2010:12:04 20:44:05
Max Aperture Value 2.8
Custom Rendered Normal
Exposure Mode Manual
White Balance Auto
Focal Length In35mm Format 24 mm
Image Number 87921
Lens 11.0-16.0 mm f/2.8
GPS Version ID 2.2.0.0
GPS Latitude 37 deg 54′ 57.54″ S
GPS Longitude 144 deg 59′ 8.35″ E
GPS Altitude Ref Above Sea Level
GPS Altitude 10 m
GPS Date Time 2010:12:04 09:44:02Z
GPS Satellites 10
GPS Img Direction Ref Magnetic North
GPS Img Direction 8.3

( Linked image is to lightboxed version as well, which looks much nicer )

Sometimes the light is perfect

And you can buy this as a print from RedBubble as well

Xmas shipping times for my Redbubble stuff…

These are the order dates for people in Australia…

If you want to buy one of my t-shirts as an Xmas gift, you only have until Dec 11.

Like this Getty Flickr Grab finalists image… as a print…

More framed prints/posters and canvas prints here.

Or my very popular #qanda t-shirt

The rest of my t-shirts/hoodies/stickers and baby clothing here

Note, white t-shirts and hoodies are still 15% off as well, till xmas day.

Or a calendar… which is 12 of my photos… in one collection.


RedBubble calendars are printed using marvellous futuristic technologies, so complex we can’t go into them here, but we can tell you they are lovingly printed on a luscious 200gsm satin art paper at the striking size of A3 (that’s 297x420mm, or 11.69×16.54″).

The rest of my calendars are here

Yeah… am a finalist in a real comp…..

They say being Nominated is an honour… well for me it is….

the below photo has been short listed in the Flickr Getty Images Grab Comp. ( See the other finalists here.. http://bit.ly/gO8d8R )

Blue Evening Ride

This one one of my evening wandering shots around Melbourne, whilst Mrs Wolfcat was in her art class.

Taking this shot was surprisingly hard.  The bridge that you stand on to get this view gets a very nice bounce when people walk on it.  So even an 8 second exposure means you have to check that people aren’t coming on the bridge at the same time.  I chose this shot over the others I took that night to put up as it managed to get its own story with the blue.  As the Ferris wheel moves it cycles through colours, so there was more than a touch of luck in this shot getting the last of the blue in the sky and the wheel at the same time.

For those that were wondering the EXIF behind the shot:

Camera:  Nikon D90
Exposure: 8 Seconds
Aperture: f/9.0
Focal Length: 15 mm
Lens: Tokina 11-16mm f2.8
ISO Speed: 250
Flash: No Flash
Exposure Program: Manual

I’m not sure of the opening times, but all twenty finalists, but it should be on display at the Challis Studios, 29 Challis Ave, Potts Point NSW 2010, from Dec 2.

And of course you can buy this image at Redbubble as well….


20% off my White T-shirts and Hoodies

Redbubble are now offering a 20% discount on all white apparel . If you choose any of my t-shirts, my kids t-shirts or hoodies. Everything cotton as long as it’s white. There aren’t even any codes to mess about with, it’s all automatic. When you configure your tee purchase to white it will show the discounted amount. 20% off until December 25.

So if you are thinking that purple is the new black.. white is the new black….

Click on each image to buy it off Redbubble. ( Just remember to choose white for the sale )

Or click here to see the complete range…


30 days till Xmas… want 15% off my Redbubble stuff in time for xmas.. ok then

Edit: new sale 25/11/10

Yes  thanks to the clever folks at Redbubble, 15% off till Monday on my Redbubble stuff.

That includes…. my t-shirts, and photos ( which are prints or canvas)

This only Valid for the next 4 days…..

( the extra bonus for t-shirts…. buy a white one and still get the 15% white clothing…..)

See all my stuff here

So if you haven’t brought your
I’ll take that as comment #qanda

, or that print you wanted go ahead….

e.g Under the South Celestial Pole

(Remember all funds from my sales on Redbubble, go into my Camera Fund, so I can buy new toys for the camera )