Geotagging without a dedicated GPS on your DSLR
Now of course this works for any camera digital camera not just high end DSLR’s.
I guess people are going to say but who cares about Geotagging photos. That is easy… say you are on a once in a lifetime trip heading to some out of the way places or even just around town. You take that great photo of a beach, a wall or even a person… now in 6 months time are you going to be able to find that location again are you even going to remember where it was roughly… This is why I geotag my photos. I can now find any location for my photos from the last 3 years, because all the photos have it stored in the Exif data.
I am going to show how using the GPS built into my phone running in the background I can do this. So you people with phones that have a GPS that can not multi-task will have to spend some money and get a logger to be very accurate. My Nokia N95-8gb runs Sports Tracker in the background just fine so this is what I am going to use as my example. Then by using software called Geotag will add lat long and altitude to all the images, before they are uploaded to flickr.
The biggest advantage of Geotag however is that it will add the data to the RAW files as well as the JPEG/JPG files. Formats include ARW (Sony), CR2 (Canon), DCR (Kodak), DNG (Adobe), ERF (Epson), MEF (Mamiya), MRW (Minolata), NEF (Nikon), ORF (Olympus), PEF (Pentax), RAF (Fuji), RAW (Panasonic), SR2 (Sony) and SRF (Sony).
Geotag should run on any operating system for which a Java SE 6 runtime is available.
Of course you can just manually add lat and long to say Flickr or Picasa but if you have a big set of photos or have travelled a long distance in a few days it is always easier to get software to do it all for you without having to guess locations.
First Step.. and most important... Make sure that the time on your Phone and on your camera are as close as possible. The software works by comparing the time stamp of the photo to the time on the track file. You can set offsets for it.. but it is just easier to get it right in the first place.
Always switch on the logging software on your phone and wait for it to get a fix. If you just fire up the software and hit the road and start driving it can take a much longer time for the GPS to get a fix than if you are stationary. Once you are happy that the software is working you are good to go. Another tip is to break up a journey into a series of smaller track files, that way if the software crashes you still have a large part of the trip as a log file. For example when I have been on my road trips I’ll often stop the GPS and start a new track when ever I got out of the car to take photos.
So lets dive in…
Getting the Log File to Geotag.
Open Sports Tracker, go to Training workouts…

Select the date you are after. |
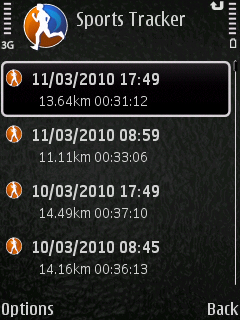
Now find the first track file you want. |
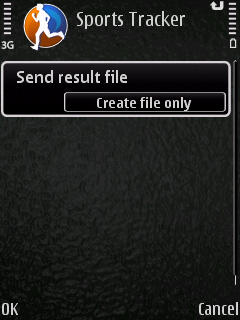 Then Choose, Export, then Export as GPX. Most GPS Log file software programs handle GPX and this format contains all the info you are after. |
 Then Choose create file only. Then Choose create file only. |
|
It doesn’t matter what drive you put this on.. so often Root Drive is just faster especially if you have a few track files to create.
.. Repeat as needed |
Then once you have all these files simply drag and drop from your phone on to your computer so then we can move to the next part of the process.
Once you have opened Geotag choose File > Load Tracks From File.

This will let you select all the small tracks files that you have created in one group so you don’t have to open each track file on its own.

Then you can either open up just the image files or a whole directory. I tend to just import into Lightroom, do a quick pass to delete the dud shots, then tell GeoTag to look in the directory from the last import and work from that.

Now with the Track Files and the Directory Open, you right click, choose Find Locations > For All Images.
At this point a cup of coffee may be required if you have a few thousand images…

Once it has finished processing you will have all your images that the gps was working for tagged…

Then just choose Save All and you are done. Now your RAW files and your Jpegs have the correct geodata embedded into them, so any time you upload to a service that supports Geocodes your photo will be mapped automatically.
You can of course get GeoTag to look up information such as lat, long, altitude, place names or get it to guess locations based on missing parts of the track file.
Another trick is to take one photo with your phone that is geotagged and then copy that information to the rest of the photos. This is great trick if you are in just one place. As another trick before going indoors take a photo of the front of the building, then use that as your tag if you cant get a GPS signal indoors.
Of course the easiest thing to do is to buy a GPS for your Camera, but if you don’t mind spending a bit of time the above steps should save you a bit of time money and still give you what you need.
(PS, I still have dedicated GPS for the camera on my to buy list.. but I am a bit fussy like that :-))


Discussion Area - Leave a Comment