Entries Tagged as 'RoadTrip 09'

3000K of Australia in under 7min

This is the main part of my trip compressed down to just over 7 min of video.

Of course like all tech there were some issues, namely the HD died on the way to Canberra taking with it the video from Newcastle to Canberra and also meaning I could not get the Canberra to Melbourne video as well.

However this still covers over 3000k of Australia from Melbourne to outback NSW to West Queensland then down the Pacific Highway to Newcastle.

I recorded each days video or approx 500k of compressed video then ran all those subvideos to make this master file.

Enjoy the changing landscape of this amazing country.

The video was all recorded at 10FPS onto my WD 320 HD as avi’s from a logtech 3000 webcam recording into virtualdub. At the end of each day the video was compressed using Windows Movie Maker on a Hp Mini Note running Vista, then all the subvideos were compressed again, using the good old speed up double till the movie was below the 10min mark. Nothing more complicated than that.

Yes I am in the video at approx 2:45 when I got out to photograph a lizard on the road.

The Approx Route:

View Larger Map

This image was taken at 4min 22 in the video.
Driving into Rain (B&W Version)

(The Car Computer… set up)
The Car Computer for the Road Trip

Circular Polarisers the 2nd filter to buy for your camera.

The first filter to buy is obviously a UV Filter…. for two main reasons. Firstly they block UV … and secondly they are a great sacrificial part of the lens. Scratch the filter and you’re up for $50-100. Scratch the lens on the other hand… Also the filter will break first if you drop your camera, the lens tends to hit the ground first and the filter takes the shock and breaks.

But back to Polarisers…. Ever wondered how people get those amazing travel shots where the sky is a deep blue and the water a stunning green? And yet every photo you take is all washed out and even overblown?

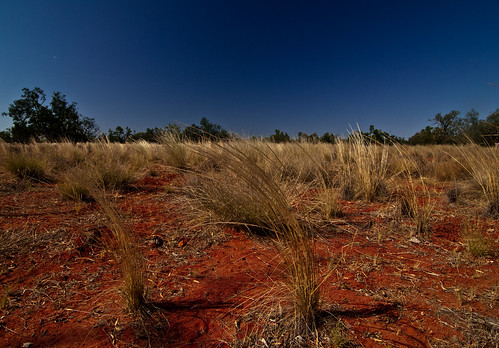
Like this shot perhaps…

Without a Circular Polariser

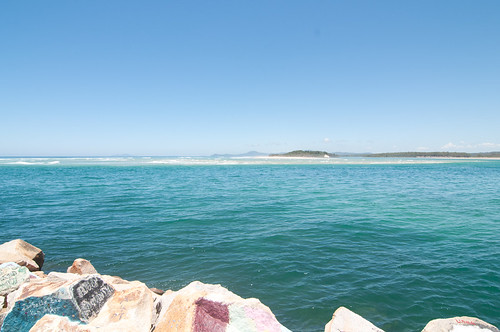
The only difference between the above shot and this one is the Circular Polariser that was on the camera.

With a Circular Polariser

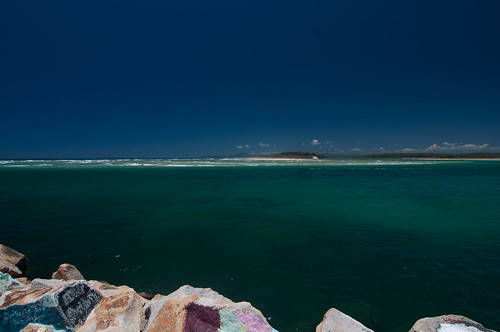
Now as you can see, this shot is a lot richer in its tones and colour. I should have shot the second shot a bit slower (to pull in a bit more light to compensate for the filter) but I took these shots to show the difference between with and without the filter. You will also notice that the filter has cut down dramatically on the reflection in the water showing the rocks just below the surface.

Settings for both shots were:
Camera:      Nikon D90
Lens: Tokina 11-16mm F2.8
Exposure:     0.003 sec (1/320)
Aperture:     f/8.0
Focal Length:     13 mm
ISO Speed:     200
Exposure Program:     Manual

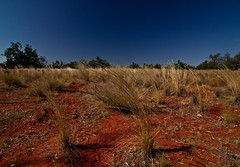
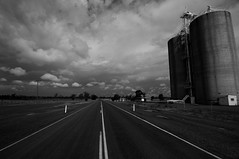
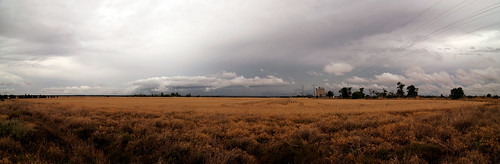
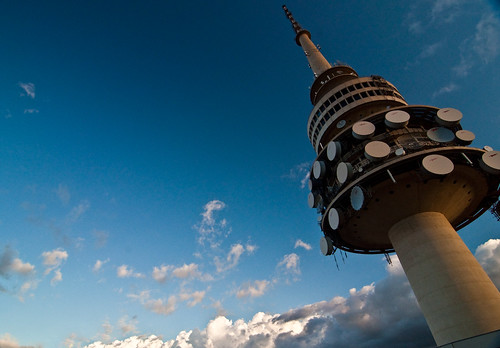
Some people say don’t use Polarisers on really wide angle lenses like my Tokina 11-16mm. Or you get an effect like below. Now see, I liked the effect in this image… the dark banding across the sky helps weight the image to the side of the tower and results in a more dramatic effect. But one thing it does mean is that stitching a panorama can be nigh impossible (due to the colour banding across each shot). You could tweak the filter for each frame comparing it to the last (using a tripod to keep the camera steady).

Black Mountain Perspective

One thing to watch for in really wide lenses however is Vignetting (darkening in the corners of your shot, which is almost black). The Tokina 11-16mm at 11mm with a Polariser on is so wide and the filter so thick, that vignetting does show up in the corners of the shot. In most cases here I ended up shooting at 12mm or higher – just to keep the filter out of the shot. Sure I could crop out the vignetting later but pushing the lens that little bit saved me a lot of work in Lightroom later. (Best clicked through to see the large versions on Flickr)

With Vignetting

Vignetting Removed

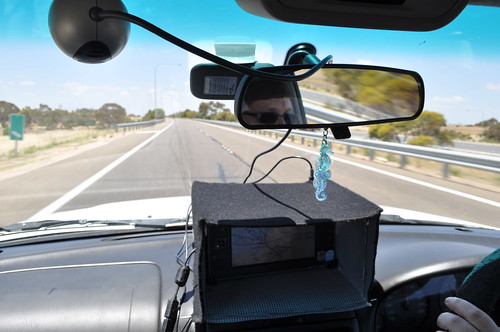
The other issue is not touching the damned filter. It has taken me a while to get used to spinning the filter to the correct level or polarisation without touching the filter itself. Also watch for lens hoods… most of them even petal shaped hoods make it very tricking to reach the filter to move it. Now my fingers are not big mens hands either, so you may need to work out which works best for your lens and hood combination. The Tokina for example I just don’t bother with the hood when I have the filter on, the Sigma 18-200mm that I have is o.k – now that I have got used to it.

So if you are thinking about ever shooting water, sky, or the big landscape that is Australia go out and get yourself one of these filters now, in fact get more than one if you have more than one lens… you will not regret it for a minute and will be wondering why they hell you didn’t get one earlier.

Red Earth, Blue Sky Country

For more info read the Wikipedia link on Polarising Filters

Putting the #wtrip09 5000KM across Australia into perspective.

Now Australia is a big country….  a very big and very empty country.

The #wtrip09 drive ended up being 5025km so all the side trips added 800km more than the planned route.  But that was not a surprise…

So here it the route I had planned (still cleaning up the KML files) then compare what kind of road trip that would have been below…


View Larger Map

Or 400km less is this drive

View Larger Map

Or only 100km more…

View Larger Map

Or 200km less than what I did would be this drive…

View Larger Map

And 200km more is this trip….

View Larger Map

or across China

View Larger Map

One of these days I might even do some of these drives….

#wtrip09 Quick Facts and Figures

Been home a week now and busy sorting out KML/GPX Files, dealing with photos and putting all the camping gear away.

So here are some of the facts and figures from the trip 🙂

Red Earth, Blue Sky Country

  • Minimum distance planned for the trip: 4,203 km
  • Total distance (that is door to door): 5025KM
  • Total Cost of Petrol: $623.24
  • Total Litres: 491.17
  • KM/Per Litre: 10.23
  • Most Expensive: 138.9 BP Cunummulla
  • Tweets where I wrote in the Lat/Long: 48
  • Early MorningPhotos: 5000+ (including family Xmas day ones)
  • Percentage of Photos Geotagged to within 20Meters: 95
  • Hardware Failures: 1 320 WD HD Drive… Rooted when we stopped in Canberra (MBR error)
  • Roadkill: 1 Bird (countless insects)
  • Near Miss: 1 Emu (missed by 30 cm or so)
    Driving into Rain (B&W Version)
  • Total Distance of Video for the trip: Approx 3300km (will try and rescue another 500km of video yet)
  • Total Distance Recorded as GPX files: 5000km (only one Nokia GPS fail on a small side trip)
  • Number of Twitter followers meet IRL for the first time (Not including a dog): 4
  • Number of Bolt of lighting seen: 4 (number missed because storms hit the day after I left 30K+!)
  • Number of States/Territories Driven in: 4
  • Damage to the Car: 1 Stone Chip to windscreen (Location Dual Carriage way just outside Taree of all places!), 1 blown rear power outlet.
  • Most Easterly Point: -28.636305°, 153.637817° (Cape Byron Light House)
  • Most Northerly Point: -26.397385°, 147.176207°
  • Highest Point: 850M -35.275425°, 149.097745° (Black Mountain Telstra Tower)
  • Lowest Point: 0 Meters (Surfers Paradise + Norah Head and other beaches)
  • Longest Distance Between traffic lights (not inc side trips): 1800km (from -35.836815°, 144.907532° which were roadworks in NSW to Dalby in QLD)

Storm Over the Field

I will put together the driving videos and the KML files when I have finished cleaning them up.  Most of the KML files are a lot larger than they need to be as I would leave the N95 running whilst I stopped to take photos and wandered around.

The rest of images I uploaded to Flickr are in my #Wtrip09 Set

Full Route for #wtrip09 (from home to home)

Here is the full route of the#wtrip09 travels. Minimum distance is 4,203 km, with the first 6 days on the road being on my own.


View Larger Map

The point markers are approximate stops… some are just over night others are for more than a couple of days.

Of course you will be able to follow the trip on twitter via the hashtag #wtrip09

small change to day 2 #wtrip09 route

Due to an offer to stop by for a drink and a tour by a tweep….  I have made a small change to Day 2 of #wtrip09…

basically about the same distance, but a bit more dirt driving… lucky I have that new set of Coopers ATR’s on the Suby so that wont be a problem.

so here is the more detailed route for day 2.


View Larger Map

remember if you know of something I should see along the way let me know 🙂

full route in this post.

Final Route for #wtrip09 in one Map

Here is the route I am planning on taking for my Xmas Roadtrip.

Like last year it is a week on the road by myself with the usual array of phones, gps, camera and laptops :-), will be taking the small tent and camping along the way doing about 400k per day on average for the 2200km trip to Brisbane.  I should be leaving around Mondaythe 14th of December to arrive in Brisbane on the 20th of Dec.

If you know of something I should see on this route please let me know.


View Larger Map

Details on the Red Bubble Calendars

Click on the Calendars below to see each one in full size

3990393-2-black-and-whiteAustralian SunsetSelective Colouring

From Red Bubble….

1. Calendars are printed on high quality, high density paper that’s easy to write on
2. The cover and all pages are printed on 200gsm high quality satin art paper
3. Calendars have a hanger and white wire binding
4. They’re A3 size (297×420mm, or 11.69×16.54”)

They’re A3 size (that’s 297x420mm, or 11.69×16.54″)

and via standard shipping in Australia: 2 – 4 business days

FYI if I can sell a few of these I can get some new filters for my camera before my road trip at Xmas to Brisbane.

#wtrip09 Melbourne To Bris-Vegas

Here it is…. dates and destination have been locked in….

The Only toy I am missing is a GPS for my D90…. what I am thinking is the Solmeta Geotagger N2 :-), but have to get Finance Committee sign off. (but with all the other expenses may drop off anyway.)

I have to be in Bris-Vegas, either Sat the 20th or Sun the 21st, but will be working out the day I leave much closer to the trip itself.

Remember if you know of something along the way that I should see (or even out of the way on the way…) leave me a comment below.

Melbourne to Brisbane… 6 Days on the Road… and 2,185 km

Day 1: Melbourne to Barmah – 253k

View Larger Map

Day2: Barmah to Hillston – 384k


View Larger Map

Day3: Hillston to Gundaooka National Park – 362k

View Larger Map

Day4: Gundaooka National Park to Charleville – 506k

View Larger Map

Day5: Charleville to Miles – 407k

View Larger Map

Day6: Miles to Brisbane – 335k

View Larger Map

First stage planning for my new #wtrip09

yes… I have already used the hashtag #wtrip09 once this year… but I am planning another road trip at the end of the year…

So here is the new trip, and like #wtrip08 I shall be on the road by myself for a week with to many toys….

remember if you know of something along the way that I should see (or even out of the way on the way…) leave me a comment below.

Melbourne to Brisbane… 6 Days on the Road… and 2,185 km

Day 1: Melbourne to Barmah – 253k

View Larger Map

Day2: Barmah to Hillston – 384k

View Larger Map

Day3: Hillston to Gundaooka National Park – 362k

View Larger Map

Day4: Gundaooka National Park to Charleville – 506k

View Larger Map

Day5: Charleville to Miles – 407k

View Larger Map

Day6: Miles to Brisbane – 335k

View Larger Map