Red Bubble Calendars
I now have 2 Calendars based on my photos up on Red Bubble… 🙂
Remember I have a camera addiction, so please don’t be shy….
I won’t be upset if you buy one of them…


I now have 2 Calendars based on my photos up on Red Bubble… 🙂
Remember I have a camera addiction, so please don’t be shy….
I won’t be upset if you buy one of them…
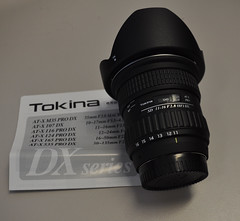 The very long overdue post about my birthday present lens…. (and by birthday present I mean not only Mrs Wolfcat but the rest of the family all chipped in for this…)
I had been looking for a wide lens for quite some time… esp since my road trip last Xmas where I spent a week in outback NSW. A place where I shot so much at 18mm (the widest I could go with my kit lenses) I knew that a wide angle would be one lens that would get a lot of use on the camera.
 So why the Tokina and not say the new Nikon 10-24mm which has an even bigger range. Two things… firstly range isn’t that important with a wide angle lens. Most of the shots I take with this lens are done purely at the 11mm mark. Occasionally at the some where in-between… but rarely so. I often try and use foot zoom. (the old step back or forward). Secondly the speed of the lens. The Tokina is a constant F2.8 lens… which means it sucks in light. The Nikon wides are F3.5 to 4.5 and still don’t have optical stabilisation. So the Tokina has most of the wide part of the range I wanted and works much better in low light. (Also there is the small issue of cost… the Tokina is a LOT cheaper, and IMO a much better lens)
 Now owning the Nikon D90 also meant that I can autofocus with this lens. A point to remember about cheaper Nikon DSLR’s is that they drop the autofocus motor on models such as the D40, D60 and D5000. So whilst you could use this lens you will need to manually focus. Manual focus on this lens though is a thing of pure beauty. It has the nicest autofocus/manual focus mechanism that you can play with. Your hand is usually already on the barrel of the lens, just pull the focus ring forward and you are in manual focus. No fiddly switches on the camera body or on the lens.
One thing to realise about this lens is that it is really WIDE. And because of this… that nice little inbuilt flash on your camera is a big fat no go. The lens casts such a shadow that it shows up in any photo with the inbuilt flash. You might be lucky and crop it out of a shot… but don’t bother… just get a real flash (PS can someone please buy me a real flash 🙂 as I don’t have one yet). The other thing to watch with the wideness of the lens is when doing macro work is the same shadowing comes into play.
 There are going to be some people that think… what macro work, wide angle lens… but then the are missing the point. A wide lens is not just for getting it all in, but is great for throwing out perspectives and getting nice and close as well. Being a very fast F2.8 lens it works very well indoors with soft ambient lighting. This means you can get some great naturally lit hand held shots with no distracting flash calling peoples attention to your photography.
 One thing you will notice straight away over a kit lens is that it’s a very heavy lens at just over 1/2kg you will notice the weight when carrying it around all day. But I prefer to measure by the on camera weight. With my Sigma 18-200 F3.5-6.5 lens I am holding 1.2kg in my hand, with the Tokina it is 1.35kg. Those extra grams all start to add up especially after shooting for a couple of hours. (Note I don’t have a battery grip either so this weight is the D90 + internal battery only).
So here is the technical info for those that just care about the numbers….
| Mount availability: | Canon and Nikon APS-C |
| Focal length: | 11 – 16mm |
| Maximum aperture: | f/2.8 |
| Minimum aperture: | f/22 |
| Optical construction: | 13 elements in 11 groups. |
| Coatings: | Multi-layer |
| Angle of view: | 104°~82° |
| Minimum focus distance: | 0.3m |
| Reproduction Ratio: | 1:11.6 |
| Focusing Mode: | Internal Focusing |
| Zoom Mode: | Rotary Zoom |
| No. Aperture blades: | 9 |
| Filter Size: | 77mm |
| Lens length : | 89.2mm |
| Lens Hood: | BH-777 |
| Weight: | 560g |
| Accessories: | Flower design Bayonet lens hood (BH77A) |
I purchased this lens from D-D Photographics by phoning them at 1:30 on a Thursday to check that they had it in stock and it was sitting on my desk in Melbourne less that 24 hours later. The other great advantage was that they had just dropped the price a few days before so I also managed to buy a Hoya Super Pro Filter (Super MHC Pro1 UV) for the lens and with shipping it still came in under 1k.
I’ve had this lens for over a month now and it easily spends 60% of its time sitting on my camera. If you are thinking about a wide lens… do try and track one of these down just to have a play, you might, like I did come away having brought one.
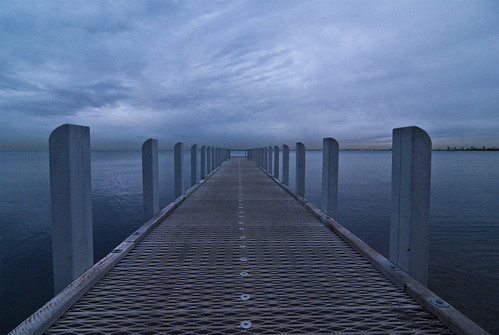
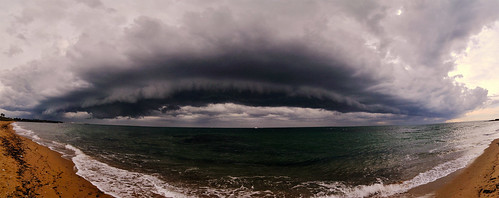
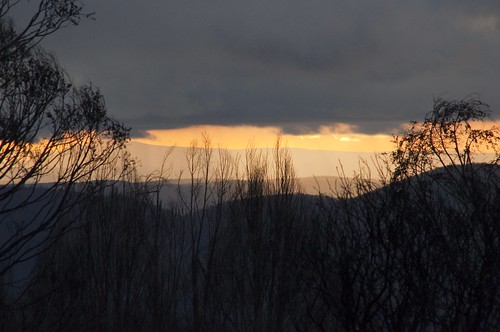
 Last weekend I finally got one of the great weather shots that I had always wanted to get…
That of a gust front.
So I thought I would share with you one of the tricks of how I got this… Shots of weather are are all about timing… and your best friend is the weather radar.
I could stay at home until just 20 min before the storm front passed over the place I wanted to go to.
This radar capture from the day… shows the progression of the line of storms across Port Phillip Bay. After watching this for a few loops I could even work out an approximate speed for the line of storms moving through.
Once I had the speed… I knew how long to wait before heading down to the beach. So I grabbed the D90 and had the Tokina 11-16mm on the camera before I got out of the car. This way I didn’t have to change the lens on the beach in the wind and salt.
I was at the beach for less than 30 min and got a couple of my keeper shots within 5 min of getting out of the car.
So every once and awhile do take the time to look at the weather radars (I use prefer the Weatherzone one – because it has a lightning tracker as well)
And here is the shot…. enjoy.
 Someone asked me how I do the tone dropping on images… That effect where you have just one primary colour showing whilst the rest of the image is black and white.
Well here is the simple way I have found to do it.
This is done using Photoshop CS4 (Win Version) (but the principal is the same for all graphic editing software, just the keystrokes are different)
There are two main ways of doing this tone dropping effect. The easy way for a single object is simply to duplicate the image three times (always have a backup layer) Then de saturate the middle layer, that is make it black and white. The shortcut for this is CTRL+SHIFT+U. Or if you want fine control… then you go to the Image Tool Bar (Alt I), Adjustments, then Choose Black and White (or just ALT+SHIFT+CTRL+B) . I tend to only do the quick desaturation option 🙂
Once you have this black and white layer and you have a simple area you wish to keep in colour… you erase the top layer leaving only the single colour area. This will only work it you are doing something really simple. More complicated colour and shapes… is what I am really talking about…
So here goes.
Step 0. – Choose an Image
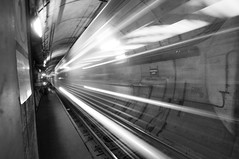
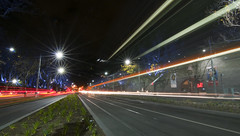
You are looking for an image that has a striking colour in it. When taking the shot, you might even want to look for a colour that will stand out and ensure that you capture as much (or as little) as you want. The image I have chosen to show you is based around a long exposure of car and tram rear lights. But you will see on my Selective Colouring Flickr set that I use lots of different objects and colours.
Step 1. – Import your Image
This is the image as it appears imported from the NEF file from my Nikon D90 into Camera Raw. Here you can tweak all the exposure and vibrancy settings, it also helps to give a slight nudge to the Saturation, just to help bring out some of the primary colours.

Step 2. – Make some layers to play with.
 Now in the layers palette make a duplicate of the background (drag the background onto the new layer icon, next to the trash). This way you have a nice original layer to return to if you make a mistake and don’t want to reimport everything.
Step 3. – Get the Colour.
In this image I am after the red. Remember primary colours are the easiest to work with and make for the strongest images as well. You can of course use the colour selection tool to choose a different colour, but oh that gets tedious.
To bring up the Colour Selector… Choose Select from the Menu Bar (ALT-S) then Colour Range.
It will default to Sampled Colours. Click on that to bring up the following menu.

In this case we are after the reds… so choose red. You will then see a sample of the selection on the preview window. At this point you may get a screen that says.
” Warning: No pxiels are more than 50% selected. The selection edges will not be visible.”
All this means is that you will not see the marque on the screen showing you a selection.
Step 4. – Processing the Selection.

You will see in this screen grab that the marque lines are showing. But like the warning dialogue box you might get… not all of the red is showing as selected. Don’t panic it is… Now do a copy of the marque CTRL+C to store it.
Step 5 – Making the Red and the Black and white.
Now we have a copy of only our red channel in the clipboard. We need to put it into a new layer. Either select the new layer command in the layer window or just press CTRL+SHIFT+N to create this layer.
 Once the layer is created, simple Paste (CTRL+V) the colour layer into the new Layer 1. Now you have a in this case Red only channel to play with.
Now we take the Background Copy Layer, select that and Desaturate it. Either via the CTRL_SHIFT+U or the ALT+SHIFT+CTRL+B methods.
Hey presto you have a rough cut to work with.
Step 6 – Not Strong Enough?
 Perhaps at this point you are thinking that really it is all wishy washy and not worth the effort so far. Yes you are right. Often at this point the colour is not that intense. The easy fix at this point is to duplicate the colour layer one or two times (sometimes more) until you get the desired strength of the output you are after. In this case it was only two layers.
Step 7 – The Final Touches.
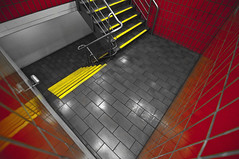
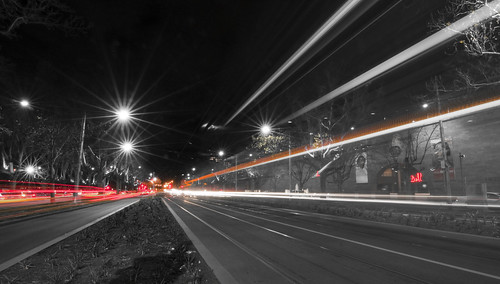
 Now this image was easy. Here you can see the isolated red layer and the placement of colour across the image. But say there was a red light at the top of the image, that you really didn’t need. On this layer (making sure you merge down all your duplicates if you have created them) you get the eraser tool and delete the areas of colour you don’t want. If I was being really fussy I could have deleted a few spots of red around the place just to clean the image up. (another tip… before you start erasing stuff, duplicate this final colour layer, turn it off… that way you don’t have to worry about the history buffer going to far when doing fine erasing)
And here is the final image…
Technical Data on the Shot.
 Camera: Nikon D90
Exposure: 20seconds
Aperture: f/22.0
Focal Length: 11 mm
ISO Speed: 200
Flash: No Flash
Orientation: Horizontal (normal)
Software: Adobe Photoshop CS4 Windows
Exposure Program: Manual
Date and Time (Original): 2009:09:01 18:50:24.00+10:00
Max Aperture Value: 2.8
Exposure Mode: Manual
White Balance: Auto
Focal Length In35mm Format: 16 mm
Lens: Tokina AT-X 116 Pro DX – 11.0-16.0 mm f/2.8
White Balance: As Shot
Remember in the digital world… if you make a mistake it doesn’t matter… you can just start again… So go out take photos and play.
Another little video from the D90, this time 40secs of the model trains at Australian Model Railways Association (Vic Branch) show. You will see the banding in this shot as well, this is one of the big problems with the D90 and video called rolling shutter.
(Updated Post: with 2min video – this is the same display as the photo below)
Longer Video
Short Video (41 Seconds)
And my fav shot from the day… a real miniature… not a tiltshift 🙂
Taken at the 39th Australian Model Railway Association Vic Branch Display. Model Railway exhibition
Aust-n-Rail "Thomspon River Canyon" Display
This was shot using my 55-200mm VR Kit lens that I got when I purchased the D90.
After living in Melbourne for 5 years I finally got to do Puffing Billy last weekend…. We did the full return trip from Belgrave to Gembrook. And I left my Nokia N95-8gb running with Sports tracker and created this KML file of the trip. You will notice that in places it jumps a bit which would be due to the thick tree coverage on the route.
Enjoy.
Get the KMZ file here as well
And my fav photo from the trip…
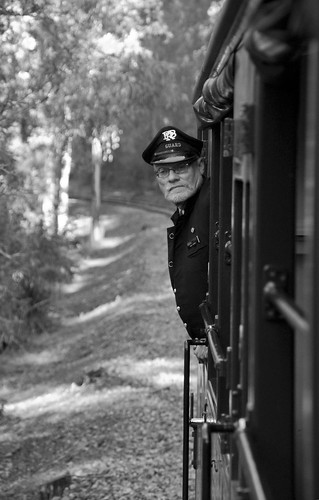
See the previous post for video from the trip as well taken on the D90.
Well until the other day that is… See I brought the camera to do still photography… that is what I wanted and that is why I brought the D90… not for the video function.
Now lots of people have written about the Video function and its benefits and draw backs and seeing as I have used this feature all of 3 times in the last 6 months I will leave them to talk about it.
But here you are… 33 Seconds of 720P Video from Puffing Billy shot on a Nikon D90 with a Tokina 11-16mm lens.
click here to watch in HD stand alone
The following video is in HD.
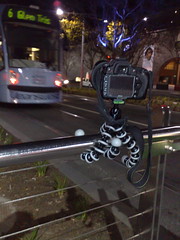
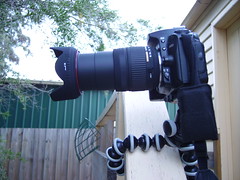
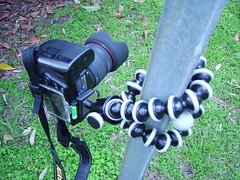 Two weeks ago I was asked if I wanted to review one of the Gorilla Pods… and I jumped at the chance. I remember seeing these a few years back long before I got my Nikon D90 and at the time thought I need one of those…. now I have had a play for a few weeks… I can look back on those initial thoughts and still say yes. (but like with all reviews there are a few caveats)…
The Joby Gorillapod SLR-Zoom is what I got to play with. This is the bigger of the Pods and is the 2nd to largest of the grips holding up to 3kg. In all my playing around I used the heaviest stuff I had.. my Nikon D90, plus Sigma 18-200mm (total weight 1.2kg). And I would say if you have an SLR of any sort and are thinking about one these tripods… just forget the SLR version… holding only 800g the price difference is so insignificant you will have buyers regret before you have even left the store.
| Gorillapod | SLR | SLR-Zoom |
|---|---|---|
| Designed for | Prosumer cameras Lightweight SLRs Camcorders |
Heavy SLRs Professional tripod heads |
| Holds up to | 800g | 3kg |
| Size | 25 x 5 x 5cm | 25 x 6 x 6cm |
| Weight | 165g | 241g |
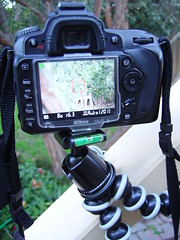
 But when my package (The Gorillapod being in a recycled cardboard no plastic bag which was very nice) arrived it had a little bonus as well… the Ballhead (still in the older style glossy cardboard). This little optional accessory is one of those things that really should come with the SLR Zoom by default… and is the extra thing that makes the item really useful but costs more. If you like Dutch Angles.. then by all means get the SLR-Zoom without the Ballhead… otherwise just add it to the price at purchase time and get straight photos.
But what about the Gorilla Pod itself. My fears and trepidations about it were… will it hold the weight, will it grip on the angle I want and will it remain in the same place.
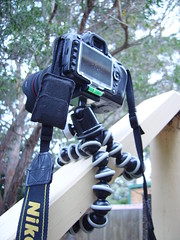 Firstly I set up the D90 on the Pod sitting at a slightly skewed angle and left it for 24 hours. Not one little bit of discernible movement could be found. Sure I was only loading it to 50% of the weight it said it could take.. but I was still impressed that it sat there for over a day and didn’t budge. But real world use is a different matter. Yes it will grip to just about anything and I have already tried mounting it to anything that doesn’t move just to see it if would. But it takes practice and a lot of it to get it just in the sweet spot.
On a couple of occasions on a round bar the camera really wants to just go for a swing and the same with putting it on the ground as a tripod. I am getting more comfortable with it however and this is not happening as much… but you will want to exercise some caution when playing with it in the beginning or else your very expensive bit of glass at the front the camera could take the fall.
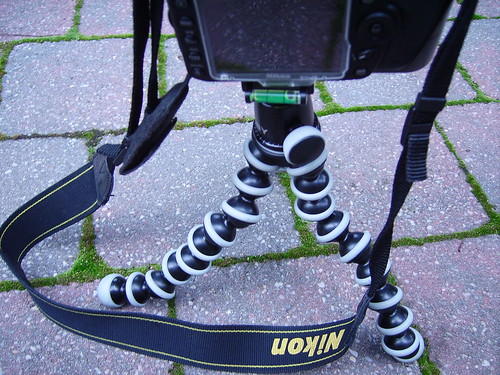
The same goes with the Ballhead. Sometimes it seems locked on but then just slowly starts turning. So you have to watch out for this. But the having the ballhead means that you can secure the gorillapod on the angle that you want.. and use the ballhead with its full 360° panning, and 90° tilt to straighten the camera, this is a much safer proposition as well. The Ballhead comes with a quick release system (which works a treat) featuring a very nice little spirit level built into it. Now when I switch to my old big tripod I miss the spirit level of my Gorillapod as I use it for nearly every shot, even hand held shots. If the quick release for the ballhead came with a pass through bolt for normal tripods I would be a lot happier. The larger flat screw design is tricky to get tight without a tool and even harder to undo if you want to swap.
The Joby also comes with a 3/8″ adapter screw as well on the 1/4″ standard tripod mount…. guess what… I know I put it somewhere safe!
This tripod with a bend halfway down also fits in my camera bag (Lowepro Nova 180 AW) as well taking up one lens spot but the trade off means that I always have a tripod on me… one that I can use anywhere and nearly anyhow.
If you don’t have one get yourself one of these… they can also help you break that eye level tripod shot that screams I was taken on a tripod. You get can get low or high and have the angles covered. And if you are going travelling stick one in your bag… you will use it… I know I do. You can even using it as a straight tripod if you can find something taller to mount it on. It might also help to get you passed pesky security guards that don’t like tripods, to get some slightly longer exposures.
Oh and the extra bonus… once you have opened your Gorrillapod and used it a few times… give it to someone with OCD… they will spend hours trying to get it straight again.
and check out this review on the Joby Gorillapod SLR
Driving video from the weekend trip to Lake Mountain.
This is the drive home… this time coming via the back road via Warburton through Yarra Junction. (Where the police pull me over… his question… what was the thing on the windscreen in my car. The R2H setup I have didn’t look like a GPS. Poor officer he asked me what it was… didn’t take long for his eyes to glaze over and for him to let me on my way :-). (The standard clip format… R2H video via a webcam under the passengers front visor)
And don’t say I didn’t warn you about the road. It has the advantage of little or no traffic and is a fun drive and is about the same time and distance as the Black Spur trip as well.
(And the KML)
View Larger Map
And the obligatory shot from the location as well.
 This is a quick post about what the EXIF data actually is and how to use it for your own benefit and to help others.
EXIF stands for Exchangeable image file format.
When it comes to digital photos it means the metadata for that photo… the shutter speed, ISO, Aperture and everything else about the shot. Even depending on the lens that was used the lens specifications and model as well. When you press play back on your camera and see the shot information, that has come from the EXIF info embedded in each shot.
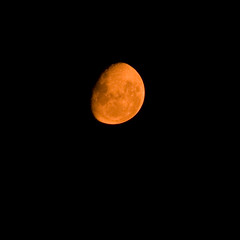
Now this is where it gets really handy. Because (and I will use Flickr as my example, but other sites use it as well) on Flickr you can see if enabled all the technical specifications of a shot. It may be a clever shot of the moon that you can’t quite get right, or a long exposure you want to find out about. With Flickr click on the Taken with a Nikon D90. More properties in the right hand column. This will lead you to a page that looks like this…. (cut back version)
| Camera: | Nikon D90 |
| Exposure: | 6 sec (6) |
| Aperture: | f/14 |
| Focal Length: | 18 mm |
| Exposure Bias: | 0/6 EV |
| Flash: | Flash fired |
| Orientation: | Horizontal (normal) |
| Date and Time: | 2008:12:26 21:24:25 |
| YCbCr Positioning: | Co-Sited |
| Exposure Program: | Manual |
| Date and Time (Original): | 2008:12:26 21:24:25 |
| Date and Time (Digitized): | 2008:12:26 21:24:25 |
| Compressed Bits per Pixel: | 1 bits |
| Maximum Lens Aperture: | 36/10 |
| Metering Mode: | Pattern |
| User Comment: | (c)wolf(@)wolfcat.com.au |
| Sub-Second Time: | 00 |
| Color Space: | sRGB |
| Sensing Method: | One-chip colour area sensor |
| Exposure Mode: | 1 |
| Digital Zoom Ratio: | 1/1 |
| Focal Length In 35mm Film: | 27 |
| Compression: | JPEG |
| Quality: | BASIC |
| White Balance: | AUTO |
| Focus Mode: | AF-A |
| Flash Setting: | REAR |
| Auto Flash Mode: | Built-in,TTL |
| White Balance Bias Value: | 0, 0 |
| White Balance Red, Blue Coefficients: | 438/256, 363/256, 256/256, 256/256 |
| Thumbnail IFD Offset: | 9210 |
| Flash Used: | 9 |
| Bracketing & Shooting Mode: | Shooting Mode: Single Frame AE/Flash Bracketing Off White Balance Bracketing Off |
| Tag::Nikon Type 3::0x008A: | 2 |
| Noise Reduction: | OFF |
| Total Number of Shutter Releases for Camera: | 12740 |
| Image Width: | 2144 pixels |
| Image Height: | 1424 pixels |
Of course all of this can seem rather intimidating to begin with (and more so once you do a bit of tweaking of the image in photoshop).
But with the above sample EXIF data you can see all you need to see about how the shot was done. For example
Exposure Program: Manual, tells me the camera was in manual mode… but
Focus Mode: AF-A, tells me the camera was in auto focus mode.
(This is for the above shot of the Side show ride at Semaphore Beach taken Dec 26 08)
 So just from these two bits of information I can see how the photographer (in this case me :-)) has done key aspects of the shot.
Now like the earlier post on using Auto Mode to dial in Manual Settings… you can use this information to dial in a set up for a manual shot based on someone else working out the basic configuration.
This is not going to teach you how to do composition and the more ethereal aspects of photography, but it can give you a leg up on getting the camera set up. The rest is up to you.
Now… you will see all my shots have EXIF showing… some people get fussy about that.. me I am not one of those… for the following reason.. a good photographer will be able to look at any shot that you have put on flickr and work it out.. just by looking at the shot, so what is the point. The other reason is that you can use your own flickr images and EXIF data to see how you did a shot. The shots of the moon I have… I can never remember the settings… so I just search my own flickr stream look up the EXIF data and there is how I did the shot 🙂
In Flickr.. in account settings “Hide your EXIF data” is what you are looking for.
(See this blog post for dealing with geodata privacy)
Final Pro Tip: Adding your name to every shot on the Nikon D90
You will also see that every shot of mine also says
User Comment: (c)wolf(@)wolfcat.com.au (the brackets around the (@) do help to stop spammers getting your email address!)
which means every shot of mine has a copyright info embedded into it. Sure some one can delete it if they want to… but.. if for example your camera was stolen.. you can show the cops that the shots are yours very quickly. (I have seen this happen!)
To set this … on your D90
Press MENU > Set Up Menu > Image Comment > Input Comment > (then like old school style scroll letters to get what you want. For some annoying reason Nikon’s don’t have the © symbol so (c) is a close as you can get.) > Enter.
You must hit ENTER or it will forget everything you just did, (took me 3 goes to get it right!)
P.S… the Moon Image… guess what I couldn’t get it right… 2 min later on Flickr and I had the settings I was looking for 🙂


