Entries Tagged as 'Nikon D90'

Why Auto Mode on your Camera is your friend…

Now… this is more for those in a hurry… and for those just starting out. All your professional photographers will find nothing here… But then chances are you aren’t even reading my blog anyway…

The reason for using Auto mode is to learn… I used it when I first got my Nikon D90 last year… most of the shots I took were in Auto, or in one of the programme modes, like sport or macro. But not any more…. most of the shots I take are in either A (Aperture Priority – Depth of Field), S(Shutter Priority – Shutter Speed) or more and more still in M(Full Manual Mode). But that is not to say you can’t learn a lot from auto mode.

These two shots show what the Camera does. On the D90 press the Play Button, then the Up Arrow on the Multi Selector (the round button with the O.K button). this will give you all the main settings for Manual Mode. From here you can see in order, Metering Mode, Camera Mode, Shutter, Aperture, ISO and Lens Length. If you press up 4 times you get all this information presented over the top of the image. But for a quick check it and to still see a thumb nail of the image this works just as well.

So here is the Auto Shot settings..

d90_auto_mode

d90_manual_mode

Now what I could do from the Auto shot to the Manual shot, was simply take the settings along that top line… remember them, then spin the Mode Dial around to M.  Then using the Main command dial (which controls shutter speed) and the Sub Command Dial (the wheel at the front of the right hand side of the camera, which controls Apeture) to the same values.  You can see the values change in the top display panel.

Now you are shooting like a pro…. you are in manual mode.  Now the fun begins…

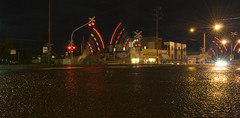
Play with shutter speed… just wind the dial to new values, does this give you a clearer shot, or perhaps some motion blur is what you are after.   The advantage of digital is that it wont cost you anything to take those shots…  and sometimes even accidental shots look great.

Oh yeah and point 2… always leave your camera on auto… (I leave my D90 on Auto No Flash) after you have been playing with manual.  The reason… if you have been doing long exposures for example, when you see something the next day and you want a shot, there is nothing worse than the camera trying to take a 30second exposure. (I’ve done it!)

With Auto you may get a shot that you wont have time to dial in until you are a pro and no longer read ing my random rants 🙂

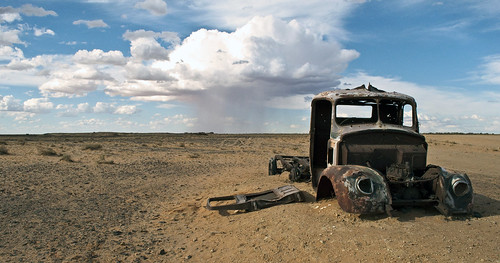
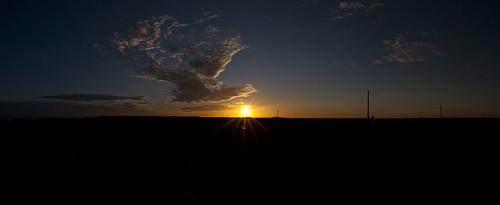
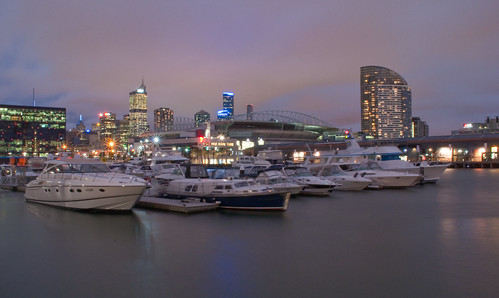
and here is an image done in Manual Mode… Click for bigger version.

Too Late for the Rain

But I don't have all the gear…


The Crossing

Exposure:  5s
Aperture: f/13.0
Focal Length: 18 mm
Exposure: +0.35
ISO Speed: 400

So you have a giant bag of stuff and twenty different lens’, 40 different filters and countless other accessories for the camera and you are lugging them around with you…. but why.

Today’s shot for example… was taken with the D90, with the following equipment the 18-55mm VR Kit Lens, the standard battery and a 52mm filter… nothing more. To compensate for the lack of a tripod and the fact it is a 5 second shot I placed the camera on the ground on the kerb, and held it down with one hand and used my other to trigger the shutter.

I was waiting for the crossing signals to go… so I had already seen the shot… but using no fancy expensive equipment (bar the camera that is :-)) I took advantage of the environment to give me an interesting angle and what I felt was a much better shot. A tripod shot is never going to get a low and have the dramatic foreground that I ended up with.

The technical data of the shot is there as well… all that I did was set the camera to Shutter Priority Mode (S) on the dial and thumb wheel (the back dial) to 5″ to set the 5 second exposure length.

Even the geotagging was done in Flickr… I knew where I was when I took the shot, so just added that later as well.

So sometimes it does help not to have all the baggage you might just get a better shot for it.  (but I still want the gear on my list…. before my wife says no you don’t need it…. for other projects)

Return to Lake Mountain (photos/video)

Burnt ForestI finally managed to get up to Lake Mountain yesterday 12 months since I’d last got up that way and 5 months after the Black Saturday fires.

As people are most probably aware I did a bit of work on covering the fires at the time due in part to my  understanding of the area and interest in weather, yet 5 months later I will still left with a sinking feeling as I drove through the region.  The grass has all grown back in the valley and the Black Spur has a lot of regrowth already but that doesn’t prepare you for what you see from Narbethong onwards.  The devastation is complete.  The forest is nothing more than barren sticks stretching skywards and the smell of ash still lingers in the air.

Stopping at Marysville there is both hope and despair.  The town was virtually wiped of the map.  Yet with only a few buildings remaining the spirit of the town has survived.  Never have I see the town so busy with people coming and going.  The long lines at the bakery and the overflowing CFA donation bucket show that people are returning and are helping the community.  Yes, and even I was one of them, the vast majority of people I saw had cameras around their necks taking happy snaps of the destruction.  I only took a few photos in town, stopping as it felt wrong for me to take photos of the misery and destruction for no real purpose.

Perhaps I am being overly sensitive as well, but letting your 10y/o kid run around a town that has had so much tragedy and suffering with a toy gun that screamed “fire  fire” which could be heard a block away is bad form of the utmost as well.  Not one resident of Marysville wouldn’t be deeply impacted on by those events and yet his kid with a toy gun were more important to him.

On leaving Marysville I then did the drive to Lake Mountain.  A road I have travelled many times, yet this road was different.  The enclosed feeling of driving through the forest was gone replaced with landscape that looked not to dissimilar to photos from the Tunguska Event. The devastation was complete. The obvious heat of the fire that consumed everything in its path is awe inspiring and humbling at the same time.

Snowy Wombat

Lake Mountain is still there, and like Marysville I’ve never seen it so busy.  And like Marysville it doesn’t look like the same place such as the destruction. The wombat I saw showed that life survived, I am sure however that the wombat must be living on food drops and there was no regrowth on the top of the mountain at all.  Most of the walking trails are still closed and the contrast of the white snow and blacken stumps is striking both in its beauty and it is fullness.

It was both a very sad experience and an empowering one seeing this first hand.  I do recommend that people return to these places… but don’t just go and take happy snaps. Stop and buy some food at the Bakery, put your change in the donation bin.  Take the kids to Lake Mountain to play in the snow, but remind them what happened in these places. It is too important to forget.

——–

Here is the Drive from Healesville to Lake Mountain… Approx 50 minutes of drive compressed to 6min, 50k distance.

for a comparison… see this blog entry from last year.

The route:

View Larger Map

Please vote for my Image :-)

I have entered my Eureka in Winter Photo into the Jetstar Photocomp in the Landmarks Category.  If you click on the image you will go to the Jetstar Photo Competition page for this image where you can vote on it

Please vote for this image in the jetstar photo com

Please vote for this image in the jetstar photo com

This is one of those images that comes from always looking for a photograph and having your camera on you at all times.

Taken at lunch time two days ago I noticed the buildings around me reflected in the puddles from the showers Melbourne had.  However this took a few min just to get the composition just right.  Firstly there was the issue with the leaves causing ripples and distorting the reflection to much and then there was the issue of getting the angle just right.

So here is the one thing I did in photoshop….  I rotated the image 180degress.  I could have stood on the other side of the puddle and tried to keep my reflection out of the shot…  but I didn’t I took the easy way out and flipped it.  This image on Flickr also has some colour treatment but the rules of the comp I entered said no photoshop work so the fully colourised version is what I entered.

Exif Data:-

Exposure:  0.008 sec (1/125)
Aperture: f/5.6
Focal Length: 34 mm
ISO Speed: 200

Taken with my 18-200mm Sigma Lens.

Anyway… please vote …

Timelapse with the D90

Or I could have called this what can go wrong will go wrong.

I thought I would outline some of the details of how I made the Sketch of a cup video.

Gear:

  • Nikon D90
  • 18-55mm VR lens kit lens.
  • Asus R2h Umpc
  • Nikon Camera Control 2.3.0
  • Spare Battery

The Nikon D90 does not have an interval timer function (D300/D700 do) so the only accurate way to do this is to run the camera from the computer.  The software was setup to take a  shot every 2 seconds.

Selected Exif Data:

Model – NIKON D90
Software – Camera Control Pro 2.3.0 W
ExposureTime – 1/20 seconds
FNumber – 4.50
ISOSpeedRatings – 400
ExposureBiasValue – 0.00
MaxApertureValue – F 4.00
MeteringMode – Multi-segment
LightSource – Auto
Flash – Flash not fired, auto mode
FocalLength – 24 mm
ColorSpace – sRGB
ExposureMode – Auto
White Balance – Auto
FocalLengthIn35mmFilm – 36 mm
Lens type – 234881024
Lens – 840
Noise Reduction – OFF

Now the what went wrong….

The first two drawings the camera was all set up and still managed to get to much of Cat in the drawing so you couldn’t see it.  The Software crashed everytime I stopped the shooting process.  I put this more down to the R2H being a bit long in the tooth these days.

Then there is the final drawing the one that features in the video…

Halfway through the shot the main light we had set up for the shot blew. (you can see this on the video) which meant I had to stop the camera.  Which lead to another software crash and me touching the camera. (To swap battery)  You will notice that after the light blub change the angle changes just slightly.  And that angle change also introduced a bounce into the shots.  The camera was at the very extent of the tripod meaning that I had now introduced a small bounce between frames.

Post processing was done as a batch conversion in Irfanview to down-sample the jpg’s (1194 of them)  from 2144×1424 300dpi to 720×478 72dpi

Then I used AnimatorDV Simple+ to compile the Jpg’s into an AVI format.  This was then set to encode at 10fps so that the video was long enough.

However you can see the end result is still pretty good.  Next time we do this these lessons will be taken into account and I will write another post about what goes wrong with that shot.

And here is the video….

Why VR/OS/IS Matters


Click for full size

I really do need to write more about my camera and what it does… so here is the first post in what I hope will be many on using my camera.

Firstly yes I have a Nikon D90 and I love it. But the title you will see covers all the other lens’ and cameras as well. In the nikon world it is called VR, Canon IS and Sigma OS, call it what you will but it is a modern day miracle as far as I am concerned.

Look that specs of this shot… (this is the jpg version of the shot taken straight from the camera) Taken in the Auto No Flash Mode on the dial.

Exposure: 0.2 sec (1/5)
Aperture: f/4.0
Focal Length: 24.5 mm
ISO Speed: 1600

Now the most impressive thing about this is that it was HAND HELD. Yes I could hand hold a shot at 1/5th. I was very lucky that the people I was photographing stood very still as it this length of shot any movement tends to blur people.

Imagine taking shots like this without a flash capturing the colourings and lighting of the environment without distracting the subject with bounce flashes or red eye reduction. The other setting I had changed was to turn off the focus assist light as well.

So if you are thinking do I really want to spend the extra money on VR/OS/IS, the answer is in this shot. Yes.

Oh noes… not another driving video from #wtrip09

Yes… it is…

this time the drive from Coober Pedy to Adelaide… (I forgot to hit go on one part of the drive in Sports tracker so about 10k are missing from the start of the trip in the KMZ file…)

The Start of the Journey
Here is a small panorama I made the morning we were leaving..
Sunrise over the Dugout

The Journey

and watch for the driver change at 3:46 🙂

The Route


View Larger Map

#wtrip09 – The Drive to William Creek, the video, kmz and a picture

I thought I would start with one of the side trips as a blog post for when I got home.. it may take me a while to put all the stuff I have together…

so here we are…

This is the 166k drive from Coober Pedy to William Creek as a 6min video down from the raw 15.4gig 320×240 10fps video of 1hour and 46min.

The Journey

The Route


View Larger Map

The Destination
and here is a small panorama I made at the end of the World famous William Creek Pub on the Oodnadatta Track.
William Creek Hotel Pano

KML File came via sports tracker on the Nokia n95-8gb, Pano from my Nikon D90 and the Video care of the usual set up on the Asus R2h

Buy Too Late for the Rains

finally an update about geotagging software

yes.. I know I have been very slack with the blog as of late… but when your job consists of herding cats and then do html templates at the same time it all gets a bit to much. but back to the entry.

I have been meaning to write about this for sometime… and I am sure most of you have heard of it… but hey better late than never.

As you are aware I have a very nice Nikon D90… and boy do I love that camera. But the one thing I do not have is the GP-1 Nikon GPS device (only cause I can’t afford it). However what I do have is the Nikon D90 and my NokiaN95-8gb running sports tracker. Now the great thing about this is… sports tracker not only exports to kml, but also to GPX. And GPX just happens to be the format that Microsoft Pro Photo Tools read.

Fat Cats Playground
And this very clever bit of software will let me take the gpx trace file and point it to my collection of photos from the camera… match up the timestamps and hey presto they are all geotagged.

Now it is not without issues… namely it currently doesn’t write to the .nef files and in Nikon View it will break the pairing of the images. (which is a major downer really)  But it still means I can geotag my shots very quickly as well.

I will be watching the development of this bit of software a lot more closely in the future…  so I do recommened if you have a good dslr and are running software like sports tracker than can export out a gpx file… download it from here

Finally got around to writing the #wtrip08 end post

Well o.k.. I will have a couple more I am sure to write about the trip whilst it is still fresh in my mind, but I thought I should get some of the facts and figures down asap.

So here are some facts and figures on the trip.
The Car Computer for the Road Trip

  • Planned Distance to Adelaide: 1881k, Travelled 2425k (Trip Total inc getting home via the Coast 4069k)
  • Total Fuel Cost S415.54 across 13 fuel stops (a couple were only top ups for long runs) (Most expensive was 146.9 at Ivanhoe, White Cliffs was only 128.9!)
  • Road Kill : 2 Galah’s (1 on the windscreen right in front of me… not happy!) + countless locusts!
  • Technical Failures 2 – front cigarette lighter in the forester and then the power inverter died as well, plus 2 blown fuses. result of this is about 50k of gps trace missing plus it will take me a few days to pull some nema logs together.
  • Car Issues – 2 – 1 – Leaking transmission fluid since rebuild pretrip, noticed it 100k from Wilcannia up a dirt road in a telstra dead spot… total cost of repair $20!. 2 – have bent the chrome around the towbar after bottoming out on a dip somewhere.

Farm Machinery

  • Number of wrong turns – only about 3, and no more than 1 or 2k in total. (Silliest was not seeing the Ivanhoe Caravan Park as I drove into town… of course it is the petrol station!)
  • Photos taken – 6400 (65gig! worth) (have geotagged about 50% already) (have uploaded 50 to flickr, a lot of them are repeats or differing angles working out what looked the best, or are going to be used in panoramas.  Most of the pano’s I have uploaded already use at least 50 shots to make them so smooth.

Death in the floods

  • Number of tweets with a georeference included 43.
  • Bad People I meet on the journey = 0; good people = all those I talked to along the way.
  • Number of days with rain 1 which did mean a change to plans to camp near Ivanhoe, but worked out just fine anway.  (Protip if you hear rain on the tent in the morning… wake up and put it away then don’t go back to sleep for an hour and wait till the ground has turned to mud!)
  • Number of times I wished I had the 18-200mm lens as opposed to the 2xkit lens’ I have.. most days, oh yeah and the 12-24mm DX lens would be great as well given how big the country is)
  • Number of times I was stopped from taking photos for security reasons = 0.  Lost count of number of times people asked me questions about all the gear I had and how cool it all was.

In the next few days I will try and stop spamming my twitter timeline with images from the trip, and get the KML file for the whole trip put up as well.

And yes the next trip is in the pipeline… Easter: Melbourne to Coober Pedy and back 🙂